If you’ve ever wondered how to grab a golf stick the right way, you’re not alone. Millions of beginners struggle with the basics of grip, yet it’s one of the most critical foundations of a solid golf game. A poor grip can lead to slices, weak shots, and inconsistent swings, no matter how hard you try. The good news is that mastering how to hold a golf club correctly is simple when you know the key principles. In this guide, you’ll learn the proper techniques, common mistakes to avoid, and tips to build a reliable, repeatable grip that boosts control and power.
Whether you’re using a driver, iron, or wedge, the way you grab the golf stick directly affects your swing path, clubface alignment, and shot accuracy. Forget complicated theories. This step-by-step breakdown focuses on practical, actionable methods used by pros and instructors worldwide. By the end, you’ll know exactly how to position your hands, choose the right grip style, and make adjustments for comfort and performance.
Choose the Right Grip Type
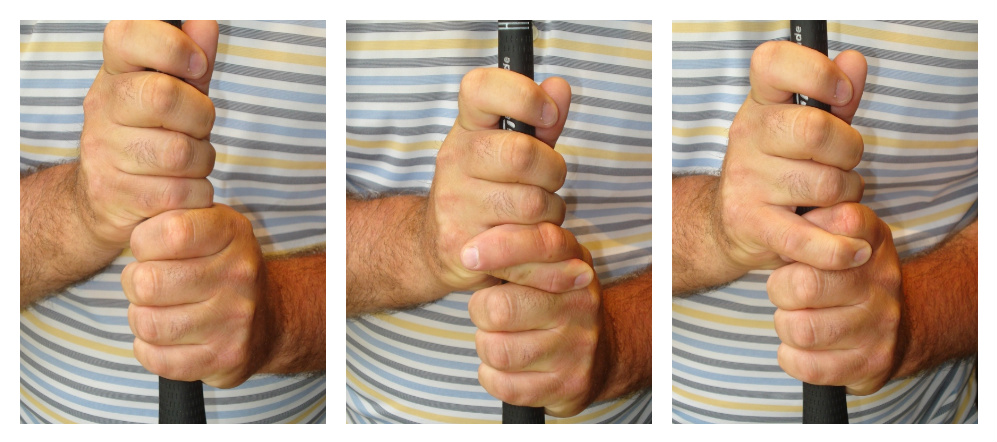
Overlap (Vardon) Grip for Most Players
The overlap grip, also known as the Vardon grip, is the most popular choice among golfers, especially for those with larger hands. In this style, the pinky finger of your trailing hand rests on top of the index finger of your lead hand. This creates a unified hand connection that promotes better control and fluidity during the swing.
• Used by top pros like Tiger Woods and Rory McIlroy
• Ideal for medium to large hand sizes
• Enhances hand coordination during the downswing
This grip helps prevent one hand from dominating the swing, allowing for a more balanced and powerful motion. It’s especially effective for full swings with drivers and irons.
Interlock Grip for Smaller Hands
The interlock grip involves intertwining the pinky finger of your trailing hand with the index finger of your lead hand. This creates a more connected feel between both hands, which can be especially helpful for players with smaller or weaker hands.
• Favored by players like Jack Nicklaus and Jordan Spieth
• Provides extra stability and unity
• Great for juniors, seniors, or those with less hand strength
Because the fingers are locked together, this grip reduces the chance of hand separation during the swing, making it easier to maintain control through impact.
Ten-Finger (Baseball) Grip for Beginners
The ten-finger grip places all ten fingers on the club, similar to how you’d hold a baseball bat. While less common among advanced players, it’s an excellent starting point for beginners, juniors, or those with limited hand strength.
• Easier to learn and feels natural at first
• Offers more immediate control for short shots
• Often used in junior golf programs
Though it may limit wrist hinge and power in full swings, it serves as a helpful transitional grip until players develop strength and coordination.
Position Your Lead Hand Correctly
Place the Club in the Fingers, Not the Palm
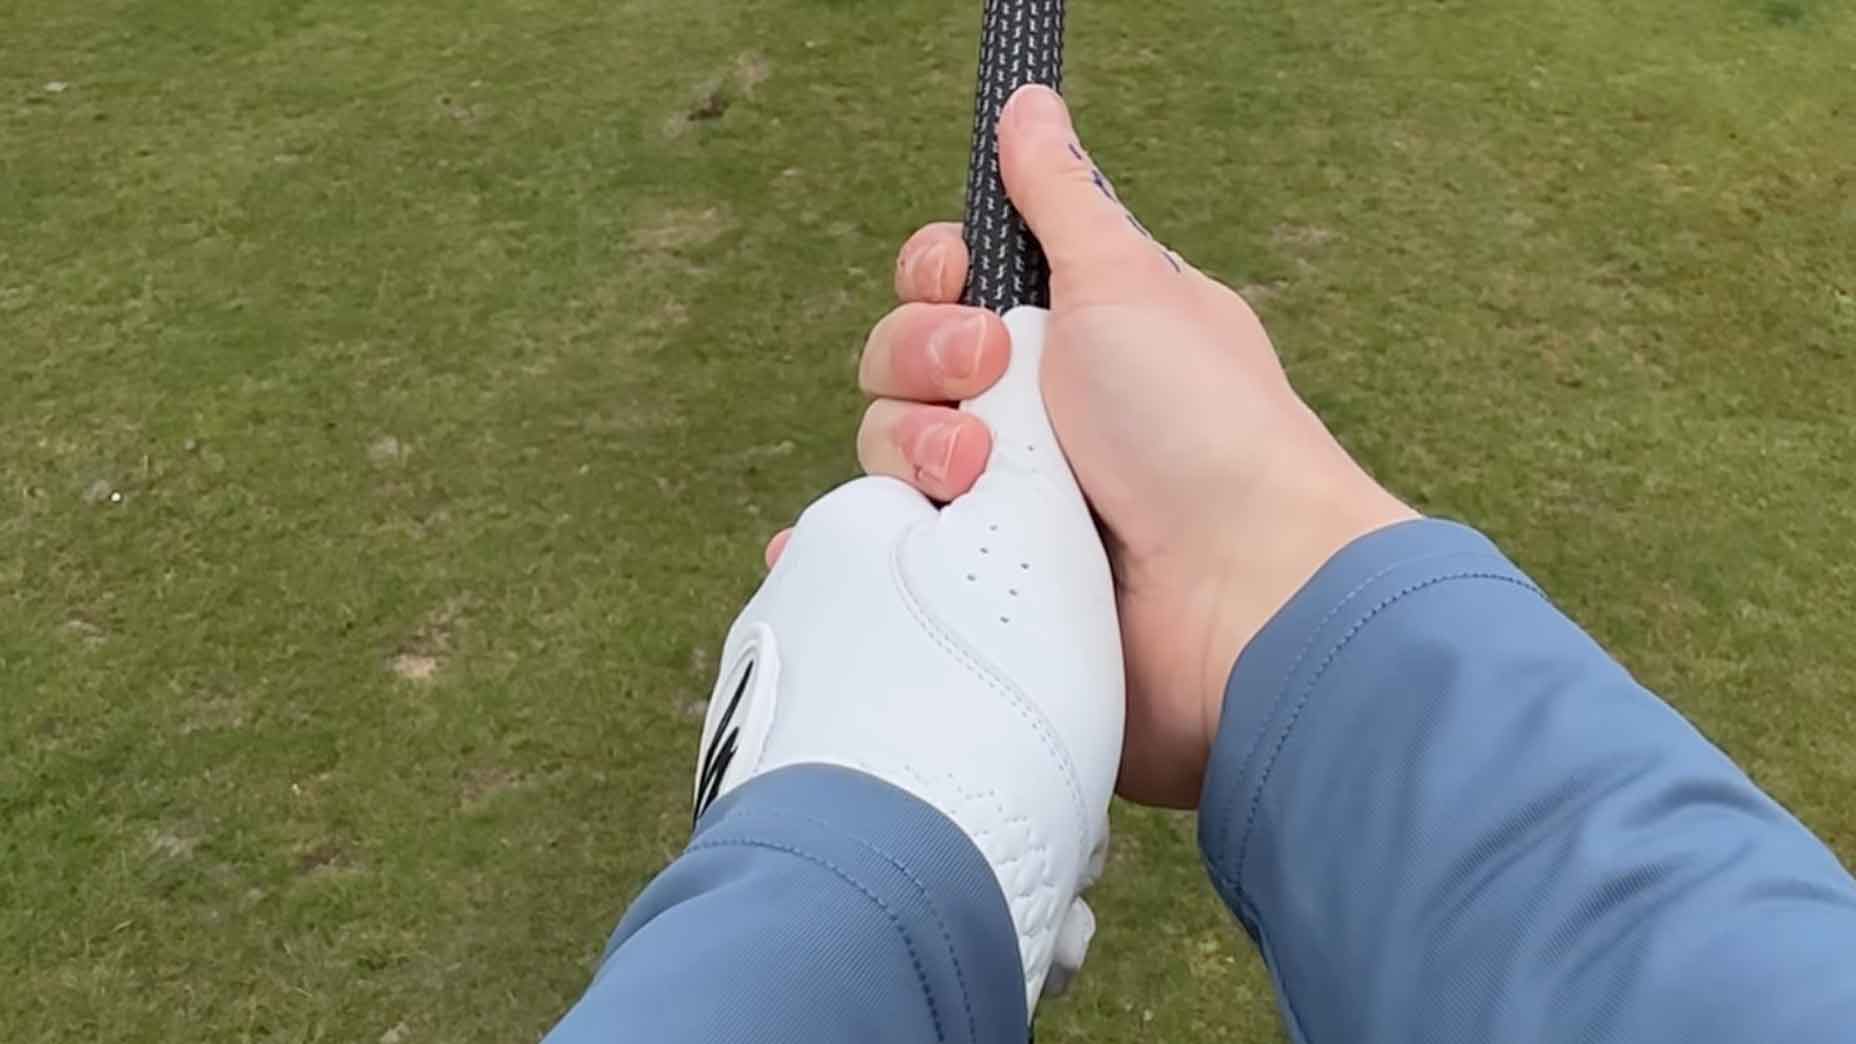
One of the most important aspects of how to grab a golf stick is hand placement. The club should rest diagonally across the base of your fingers, not buried in the palm of your lead hand. This allows for better wrist hinge and club control during the swing.
To check your placement:
• Open your lead hand and lay the club across it
• The grip should run from the base of your pinky down to the middle of your index finger
• Close your fingers around the club, keeping the “V” formed by your thumb and index finger pointing toward your trailing shoulder
This finger-based grip promotes a lighter hold, which leads to a smoother, faster swing.
Align the “V” Between Thumb and Index
The “V” created by your lead thumb and index finger should point between your trailing shoulder and chin. This alignment ensures your hand is rotated correctly on the club, setting up a square clubface at impact.
• If the “V” points too far right, the clubface may be open, causing slices
• If it points too far left, the face may close, leading to hooks
• Adjust hand rotation until the “V” aims at your trailing shoulder
This small detail makes a big difference in shot consistency.
Set the Trailing Hand with Control

Cover the Lead Thumb with the Trailing Hand
After placing your lead hand, add your trailing hand so it wraps around the club and covers the lead thumb. The lead thumb should fit snugly into the lifeline of your trailing hand. This helps stabilize the club and prevents excessive movement during the swing.
• Avoid letting the lead thumb stick out to the side
• Keep it centered and slightly pressure-free
• The trailing hand should feel like it’s supporting, not squeezing
This positioning helps maintain a neutral clubface through impact.
Form the Second “V” for Balance
Just like your lead hand, your trailing hand should form a “V” between the thumb and index finger. This second “V” should mirror the first, pointing toward your trailing shoulder.
• Ensures both hands are working together
• Prevents one hand from flipping over the other
• Promotes a square release at impact
If both “V’s” are aligned correctly, your hands are in a powerful, neutral position.
Apply the Right Amount of Pressure

Use a Light, Relaxed Grip
How tightly you hold the club matters more than you think. Most amateurs grip too hard, which tenses the arms and restricts the swing. The ideal pressure is about a 5 out of 10, firm enough to maintain control, but relaxed enough to allow fluid motion.
Think of holding a bird:
• Too tight, and you crush it
• Too loose, and it flies away
• Just right, and it stays safe in your hand
This analogy helps maintain the perfect balance of control and freedom.
Check for Tension in Wrists and Arms
After gripping the club, check your wrists and forearms. They should feel loose, not rigid. If your muscles are tense, ease up on the pressure. A relaxed grip leads to:
• Faster clubhead speed
• Smoother tempo
• Better shot accuracy
Practice gripping and releasing the club several times to build muscle memory for a lighter hold.
Diagnose Common Grip Mistakes
Avoid the “Death Grip” on the Club
One of the most common errors is squeezing the club too tightly. This “death grip” kills swing speed and leads to poor ball striking. Signs you’re gripping too hard include:
• White knuckles
• Shaking after a swing
• Inconsistent shot patterns
Fix it by focusing on finger pressure instead of palm strength, and take practice swings with a lighter hold.
Prevent Hand Misalignment
Placing your hands too far to the left or right on the grip can cause serious swing flaws.
• Too strong (hands rotated right) can lead to hooks
• Too weak (hands rotated left) often causes slices
Use the “V” rule to check alignment. Make small adjustments until your shots straighten out.
Don’t Let the Club Slide in Your Hands
If the club feels like it’s shifting during the swing, your grip may be too small, too smooth, or your hands may be too dry. Try these solutions:
• Use an oversized or textured grip
• Apply grip spray or wear gloves
• Ensure hands are clean and dry before playing
A stable grip means a stable swing.
Practice Drills for Better Grip Consistency
Mirror Check for Hand Position
Stand in front of a mirror and go through your grip routine. Check the following:
• Are both “V’s” pointing correctly?
• Is the club in the fingers, not the palm?
• Are your hands working as one unit?
This visual feedback helps lock in the correct feel.
Grip-Only Rehearsal Swings
Without a ball, take slow rehearsal swings focusing only on maintaining your grip. Pay attention to:
• Hand pressure throughout the swing
• Whether the club stays stable at the top
• If your wrists hinge naturally
This builds muscle memory and confidence.
Use a Grip Training Aid
Consider using a grip trainer or alignment sleeve that fits over the club. These tools:
• Mark correct hand placement
• Prevent sliding or rotation errors
• Provide instant feedback
They’re especially helpful for beginners building consistency.
Adjust Grip for Different Clubs
Maintain Consistency Across All Clubs
While club lengths and lofts vary, your grip should remain identical across drivers, irons, and wedges. Changing your grip for different clubs introduces inconsistency.
• Same hand placement
• Same pressure
• Same alignment
This uniformity ensures predictable ball flight no matter which club you use.
Slight Adjustments for Specialty Shots
For certain shots, minor grip tweaks can help:
• A stronger grip (hands rotated right) promotes a draw or helps fix slices
• A weaker grip (hands rotated left) encourages a fade or counters hooks
• Choking up (gripping lower) increases control for short shots
Use these only when needed, and avoid making them permanent changes.
Maintain Your Grip Over Time
Clean Grips Regularly
Dirt, sweat, and oils build up on the grip surface, making it slippery. Clean your grips every few weeks using:
• Warm water
• Mild soap
• A cloth or brush
This restores tackiness and improves control.
Replace Worn Grips Annually
Even the best grips wear out. Signs it’s time for a new one include:
• Smooth, shiny surface
• Cracks or hardening
• Slipping during swings
Most players should replace grips once a year with regular play.
Store Clubs Properly
Keep your clubs in a cool, dry place. Avoid leaving them in hot cars or damp bags, as extreme temperatures and moisture degrade grip material faster.
Frequently Asked Questions About How to Grab a Golf Stick
What is the best grip for a beginner golfer?
The ten-finger (baseball) grip is often recommended for beginners because all ten fingers sit on the club, making it easier to learn and control at first. As strength and coordination improve, many players transition to the overlap or interlock grip for better performance.
How tight should I hold a golf club?
Aim for a pressure level of about 5 out of 10. This means the grip is firm enough to maintain control, yet relaxed enough to allow fluid motion. Gripping too tightly creates tension in the arms and restricts swing speed.
Why does my golf club slip during my swing?
Slipping usually occurs because the grip is too smooth, too small, or your hands are sweaty or dry. Solutions include using an oversized grip, applying grip spray, wearing a glove, or ensuring your hands are clean and dry before each shot.
How do I know if my grip is too strong or too weak?
Check the “V” formed by your thumb and index finger on your lead hand. If it points too far toward your trailing shoulder, the grip is too strong. If it points away from your shoulder, the grip is too weak. Adjust your hand rotation until the “V” aligns between your shoulder and chin.
Should I change my grip for different golf clubs?
No, your grip should remain consistent across all clubs for predictable results. Only make slight adjustments for specialty shots, such as choking up for better control or rotating your hands to shape a draw or fade.
How often should I replace my golf grips?
Most players benefit from replacing their grips once a year with regular play. However, if the surface feels smooth, cracked, or hard, it’s time for a replacement regardless of the timeline.
Key Takeaways for Holding a Golf Club the Right Way
Learning how to grab a golf stick properly is the single most important foundation for consistent ball striking. Start by choosing a grip style that fits your hand size and strength, whether that’s the overlap, interlock, or ten-finger grip. Focus on placing the club in your fingers, aligning both “V’s” toward your trailing shoulder, and maintaining light, relaxed pressure throughout the swing. Avoid common mistakes like gripping too tightly or misaligning your hands, and practice regularly using drills such as mirror checks and rehearsal swings. Your next step is to grab a club, apply these techniques, and spend a few minutes each day reinforcing proper hand positioning until it becomes second nature.