Swinging a driver indoors often feels impossible when ceiling beams and narrow hallways restrict your motion, but constructing a dedicated golf simulator solves this spatial dilemma permanently. By utilizing aluminum conduit frames and impact screens, you can transform an underused corner of your home into a fully functional hitting bay that accommodates a full swing. This guide details exactly how to build a golf simulator from scratch, covering everything from selecting the right impact screen material to calibrating a short-throw projector for precise image alignment.
Building your own enclosure offers significant cost savings compared to pre-fabricated kits while allowing total customization for your specific room dimensions. You will learn how to construct a sturdy 16×16 foot enclosure, create a level hitting surface that protects your joints, and install a projection system that delivers an immersive experience. Whether you are using an OptiShot unit or a high-end launch monitor, the structural principles remain the same: stability, safety, and proper tensioning of the impact screen are paramount.
Selecting Materials and Tools

Before cutting any conduit or drilling into floors, gathering the correct materials ensures your project stays on budget and schedule. The core of this build relies on lightweight yet sturdy 1-inch aluminum electrical conduit for the frame, paired with a high-quality impact screen capable of withstanding repeated ball strikes. Your material list should include approximately $2,950 worth of components, with the screen and projector being the most variable costs depending on your quality preferences. Essential items include canopy hardware, bungee cords, j-bolts, and heavy-duty drop cloths to create a blackout environment.
Essential Build Components
- Frame Material: 1-inch aluminum electrical conduit (10-foot lengths) and compatible fittings.
- Impact Surface: Premium impact screen (budget $250 to $750) or a secondary net for protection.
- Hitting Surface: Synthetic turf, anti-fatigue puzzle mats, and OSB sheeting for the platform.
- Tech Hardware: Short-throw projector, mount, HDMI extensions, and a dedicated laptop or PC.
- Finishing Touches: Commando cloth curtains, magnets for securing sides, and sound equipment.
Required Tool Inventory
You will need a robust set of tools to handle metal cutting and wood fabrication effectively. A miter saw or hacksaw is critical for cutting the aluminum conduit, while a drill press ensures clean holes for the j-hooks without burrs. For the hitting bay construction, a circular saw or table saw will speed up the processing of 2x4s and OSB sheets. Always wear hearing and eye protection, especially when cutting metal or singeing synthetic grass fibers.
| Tool Category | Specific Tools Needed |
|---|---|
| Cutting | Miter saw, Hacksaw/Sawzall, Utility knife, Jigsaw |
| Drilling/Fastening | Drill press, Standard drill/bits, Adjustable wrench |
| Safety Gear | Hearing protection, Eye protection, Fire extinguisher |
| Optional but Helpful | Table saw, Grill ignitor (for turf), Ladder |
Preparing Your Simulator Space
Choosing the right location is the most critical step in learning how to build a golf simulator that feels natural to use. You need a space that offers at least 10 feet of vertical clearance to comfortably swing a driver without fear of hitting the ceiling or light fixtures. The ideal footprint for a comprehensive setup is approximately 16 feet wide by 16 feet deep, allowing ample room for the enclosure, the golfer, and the technology behind the screen.
Assessing Ceiling and Floor Conditions
Your ceiling height dictates the type of clubs you can swing; a 6’4″ golfer typically needs the full 10 feet of clearance mentioned in professional builds. Look for rooms with solid flooring like OSB or concrete, as these surfaces allow you to bolt the frame pads securely. Avoid spaces with low-hanging ductwork or fragile drywall ceilings. Additionally, proximity to power outlets is crucial for running the projector, computer, and lighting without creating a tripping hazard with extension cords.
Determining Enclosure Dimensions
The standard build described here utilizes a 16′ x 16′ x 10′ overall enclosure size to house a 14′ wide by 8.1′ tall impact screen. These dimensions provide a safety buffer on all sides, ensuring that even mishits remain within the protected area. If your space is smaller, you may need to scale down the screen size, but remember that reducing the width can limit your ability to hit draws and fades comfortably. Measure twice to ensure your frame fits perfectly between walls or beams before purchasing materials.
Constructing the Conduit Frame
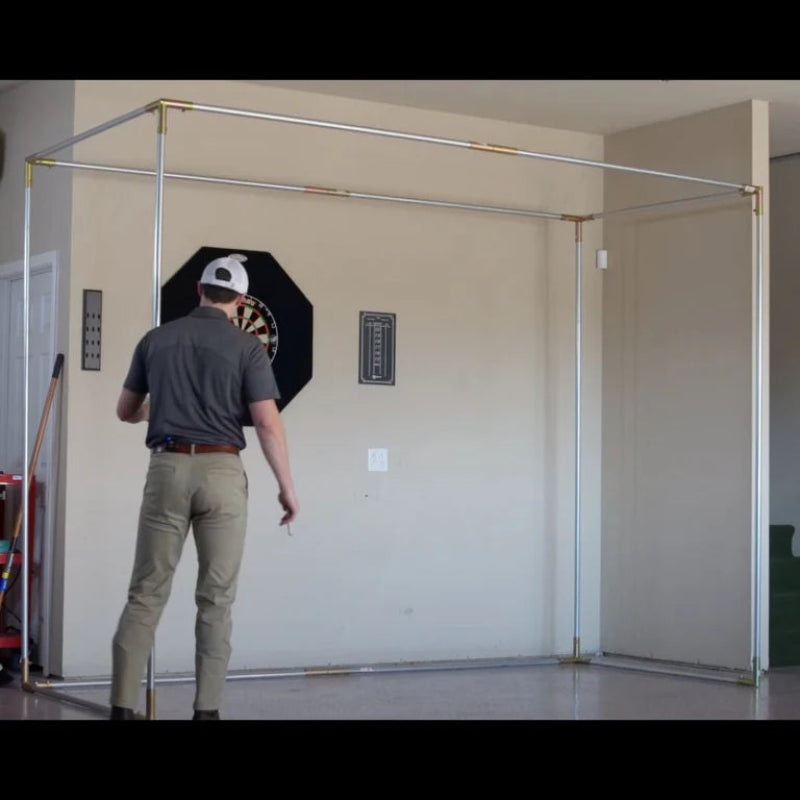
The skeleton of your simulator is the aluminum conduit frame, which must be rigid enough to hold the impact screen under high tension. This structure is assembled using 1-inch conduit pieces cut to specific lengths and connected with canopy hardware. The design typically involves vertical posts anchored to the floor and horizontal crossbars that define the top and sides of the hitting area.
Anchoring Base Pads Securely
Stability starts at the floor level, where base pads are bolted down in three strategic positions: two on the outside edges and one in the center recessed slightly for stability. These pads hold the vertical conduit posts and prevent the entire structure from swaying during impact. Use long construction screws or bolts to secure these pads directly into the subfloor, ensuring they cannot shift when you tighten the bungee cords later. A horizontal piece of conduit installed at the very bottom adds further rigidity, though the screen itself does not attach to this lower bar.
Assembling Vertical and Horizontal Bars
Once the base is secure, insert the 10-foot vertical conduit pieces into the pads and tighten the set screws. The top horizontal bars connect these vertical posts, creating the rectangular opening for your screen. It is vital to ensure all connections are tight and aligned before proceeding, as any misalignment here will make hanging the screen difficult. The lightweight nature of aluminum makes this assembly manageable for two people, but the resulting frame is surprisingly sturdy once tensioned.
Installing the Impact Screen
Hanging the impact screen is the most delicate part of the process, requiring precision to avoid wrinkles and ensure a clear image projection. The screen attaches to the frame using bungee cords and j-bolts that thread through grommets along the screen’s perimeter. Proper installation prevents the “trampoline effect” where the screen rebounds too violently, potentially damaging the projector or the screen itself.
Marking and Drilling Conduit Holes
Because grommet spacing varies by manufacturer, you must lay the screen out on clean tables to mark exact drilling locations on the conduit. Transfer the grommet positions accurately to the aluminum pipes, then drill all the way through using a drill press for perpendicular holes. After drilling, sand the holes with 100-grit sandpaper to remove any sharp burrs that could tear the bungee cords or damage the screen grommets over time. Insert the j-bolts with the hook facing inward and the nut on the outside.
Tensioning and Wrinkle Removal
To achieve a flat projection surface, attach the top of the screen first, followed by the sides and bottom. Secure the bottom edge to the floor using traditional j-hooks and bungee cords. To remove wrinkles, tighten the nuts on the j-bolts until the hook closes against the conduit, locking the bungee in place. Then, with the set screws on the frame pads loose, twist the conduit pipes up to 540 degrees. This winding action pulls the bungee tight and smooths out the fabric. Once the wrinkles are gone, tighten the set screws on the pads to lock the conduit in its twisted, tensioned position.
Building the Hitting Bay Platform

The hitting bay is where you stand and swing, so it must be level, durable, and comfortable. This platform serves multiple purposes: it elevates the synthetic turf to match the height of your simulator sensors, conceals wiring, and dampens the noise of balls hitting the floor. Constructing a raised platform ensures that your feet and the sensor unit are on the same plane, which is critical for accurate shot detection.
Framing the Raised Platform
Construct the base of the hitting bay using 2x4s ripped to specific widths (typically around 2 5/16 inches) to account for the thickness of the OSB sheeting and the anti-fatigue mat. Space these joists evenly, approximately every 12 to 16 inches, and screw them securely to the floor. For a 16-foot wide bay, you may need to join multiple sheets of OSB; ensure the seams fall over a joist for support. Add extra 2x4s in the center of the span if you notice any flex when standing on the platform, as a solid feel is essential for a confident swing.
Installing Turf and Sensor Cutouts
Cover the OSB framework with a layer of anti-fatigue puzzle mat or rubber flooring to protect your joints and reduce noise. On top of this, install your synthetic hitting surface. You will need to cut a precise hole in the turf for your simulator unit (such as an OptiShot). To do this, place the unit’s plastic cover on the back of the turf, trace the sensor locations, and cut them out with a jigsaw. Use a utility knife to flare the holes and a grill ignitor to carefully singe away loose grass fibers, ensuring the sensors have a clear line of sight.
Setting Up Projection System
Visual immersion relies on a properly configured projector system, ideally using a short-throw model to minimize shadows and maximize image brightness. Since short-throw projectors lack zoom lenses, the physical distance between the lens and the screen determines the image size. This requires a mounting solution that allows for fine-tuned forward and backward adjustments to get the picture perfectly framed on your impact screen.
Creating an Adjustable Mount
Build a sliding mount box out of plywood with a plexiglass bottom to allow the remote control sensors to function while the projector is enclosed. Mount this box to a long 2×10 plank that spans the width of the hitting bay ceiling or a high beam. This setup allows you to slide the projector forward or backward to “zoom” the image until it fills the screen perfectly. Ensure the mount is secure but movable, as you may need to recalibrate occasionally if the image shifts.
Aligning Short-Throw Projectors
Be aware that short-throw projectors are incredibly sensitive to angle; the lens must be perfectly square to the center of the screen, and the screen must be perpendicular to the floor. Even slight deviations can cause keystoning issues where the image appears trapezoidal rather than rectangular. While digital keystone correction can help, it often reduces image quality. Spend time adjusting the physical position of the projector and the angle of the screen to get the geometry right before relying on software fixes.
Adding Sides and Acoustic Treatment
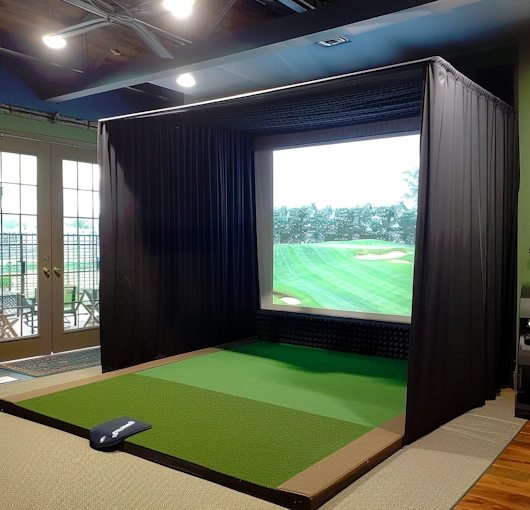
To complete the immersive experience and contain stray balls, you need to enclose the sides and top of your simulator. This not only keeps balls from flying into your living room but also creates a darkened environment that improves contrast and visibility of the projected image. Using heavy fabrics like Commando Cloth or canvas drop cloths helps absorb sound and light, making the simulation feel more realistic.
Hanging Side Curtains
Install side curtains using 1-inch conduit rods threaded through loops sewn into heavy-duty fabric. Hang these rods from the main frame or ceiling mounts so they drape down to the floor, covering the open sides of the enclosure. Replace standard set screws on the conduit with low-profile screws to prevent the fabric from snagging or tearing as you move the curtains. These curtains should be loose enough to absorb the energy of a glancing blow but tight enough to block external light.
Installing Top Canopy and Magnets
Drape a black canvas drop cloth over the top of the entire enclosure to create a blackout effect, which is essential for image clarity. Secure the sides and top framing with cutoffs of the same material, using strong magnets to hold the fabric in place against the metal conduit. This magnetic attachment method allows for easy removal if you need to access the frame or adjust the screen tension later. The dark interior ensures that the only light source is the projector, significantly enhancing the visual experience.
Troubleshooting Common Issues
Even with careful planning, you may encounter challenges such as screen markings, image distortion, or sensor misreads. Addressing these issues early prevents frustration and potential damage to your equipment. Understanding the limitations of your materials and the physics of your setup will help you maintain a high-quality simulator over the long term.
Managing Screen Wear and Marks
Impact screens can develop unsightly marks or “ghosting” after repeated use, especially with premium balls or specific fabric types. If you notice dark spots appearing where the ball strikes, consider installing a secondary protective net (like an SKLZ net) a few feet in front of the main screen. This net takes the brunt of the impact, preserving the visual quality of the screen behind it. Regularly inspect your balls for scuffs, as dirty or damaged balls can accelerate wear on the screen surface.
Correcting Image and Sensor Errors
If your projected image is not square, re-check that your screen is perfectly vertical and your projector is centered. For sensor read errors, ensure the synthetic turf is cut cleanly around the sensor holes and that no grass fibers are obstructing the view. If the simulator unit shifts during play, wedge small pieces of anti-fatigue mat around the base to lock it in place without damaging the unit. Consistent maintenance of the hitting surface and alignment checks will keep your simulator running smoothly.
Frequently Asked Questions About Building a Golf Simulator
What ceiling height do I need to build a golf simulator?
A 6’4″ golfer requires approximately 10 feet of clearance to swing a driver confidently without hitting the ceiling. Shorter players may get by with less vertical space, but 10 feet is the recommended standard for a full-swing simulator setup.
How much does it cost to build a DIY golf simulator?
A complete DIY build costs approximately $2,950 in materials, with the screen ($250 to $750) and projector ($600) representing the most variable expenses. Add another $100 to $200 for tools if you do not already own them, making this project far cheaper than most pre-fabricated kits.
What is the best material for an impact screen?
Premium impact screens work well for most setups, though they can develop visible black marks or “ghosting” after repeated ball strikes. To extend the life of your screen and maintain image quality, install a secondary protective net like the SKLZ 8×8 net a few feet in front of the main screen to absorb direct impacts.
Why are short-throw projectors so difficult to align?
Short-throw projectors lack zoom lenses and require the lens to be perfectly square to the center of the screen. Even minor angles cause keystoning distortion that creates trapezoidal images rather than clean rectangles. In older buildings where walls and floors are not perfectly level, achieving this precision can be nearly impossible.
Can I build a golf simulator in a smaller room?
Yes, but you will need to scale down the enclosure and screen dimensions accordingly. Keep in mind that reducing the width below 14 feet can limit your ability to hit draws and fades comfortably. Always measure your space carefully before purchasing materials to ensure everything fits properly.
How do I prevent my simulator sensors from misreading shots?
Cut the synthetic turf cleanly around the sensor holes using a jigsaw, then use a utility knife and grill ignitor to remove loose grass fibers that obstruct the sensors. If the sensor unit shifts during play, wedge small cutoffs of anti-fatigue mat around its base to lock it securely in place.
Key Takeaways for Your Golf Simulator Build
Building a golf simulator from scratch rewards careful planning, quality materials, and precise execution at every stage. The three most important factors for success are proper screen tensioning, a level hitting platform, and accurate projector alignment. Investing time in marking and drilling your conduit holes correctly will save hours of frustration later when hanging the impact screen.
Your next step is to measure your available space and confirm you have at least 10 feet of ceiling clearance before purchasing materials. Start by ordering the conduit and canopy hardware first, since these items have long lead times compared to standard tools you likely already own. Once your frame is constructed and tensioned properly, you will be hitting balls indoors with confidence in just a few weekends of work.