A sputtering engine and rough idle are signs your golf cart carburetor needs attention. If your cart sits unused for weeks, fuel residue and varnish build up inside the carburetor and clog critical passages. Ethanol-laced fuel makes this worse, attracting moisture that corrodes small parts. This is a frequent headache for 2015 Yamaha and similar gas models. Cleaning the carburetor restores lost performance and prevents long-term engine wear.
This guide walks you through removing, cleaning, and reinstalling your golf cart carburetor using basic tools. You will also learn simple preventive habits to keep your engine running cleanly for years.
Essential Safety Steps Before Starting Work
Working around gasoline demands caution. Take a few minutes to prepare your workspace and protect yourself.
Turn Off the Fuel Supply
Locate the fuel shutoff valve near the gas tank and rotate it to the “Off” position. If your model lacks a shutoff, pinch the fuel line with a clamp to stop fuel flow during disassembly.
Disconnect the Battery
Use a wrench to remove the negative terminal from the battery. This prevents accidental ignition or electrical shorts while working near the engine.
Let the Engine Cool Completely
Never work on a hot engine. Wait at least 30 minutes after use to avoid burns and reduce fuel vapor pressure.
Required Tools and Cleaning Supplies
Gather everything before starting to avoid mid-job delays. Most items are common in home garages.
Basic Hand Tools
- 8mm, 10mm, and 12mm wrenches or socket set
- Flathead and Phillips screwdrivers
- Needle-nose pliers
- Fuel line clamp or pinch-off tool
Cleaning Materials
- Carburetor cleaner spray (CRC or Berryman brand)
- Small brass wire brush
- Compressed air can or air compressor
- Clean shop towels
- Small container for soaking parts
Optional Replacement Parts
- Carburetor rebuild kit with gaskets, float needle, and jets
- New fuel filter
- Fresh O-rings and seals
Locate the Carburetor on Your Engine

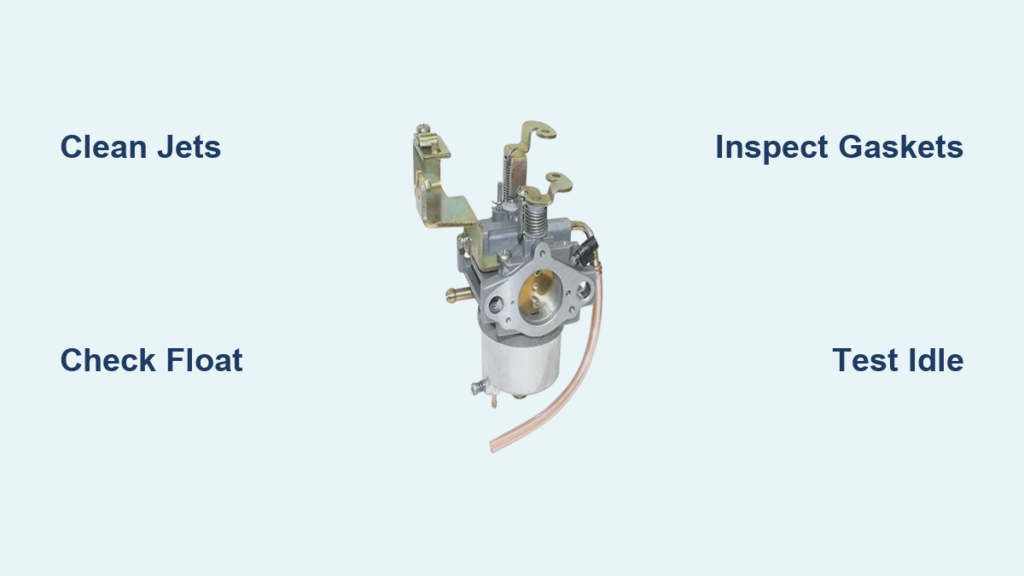
On a 2015 Yamaha gas golf cart, the carburetor sits on the side of the engine, sandwiched between the air filter housing and the intake manifold.
Identify the Main Connections
Look for three key attachments before you begin:
- Air intake tube from the air filter box
- Fuel line running from the gas tank
- Throttle linkage rod connected to the accelerator pedal
The carburetor is typically secured by two mounting bolts.
Perform a Visual Inspection First
Check for obvious signs of leakage, corrosion, or cracked hoses. Black soot around the air intake often indicates a rich fuel mixture, which confirms cleaning is overdue.
Remove the Carburetor Safely
Carefully disconnect all linkages before unbolting the unit to avoid bending small parts.
Disconnect Air and Fuel Lines
Loosen the hose clamp on the air intake and slide the tube off. Use pliers to compress the fuel line clamp and pull the hose free. Place a rag underneath to catch spilled fuel.
Detach the Throttle Linkage
Unhook the throttle rod from the carburetor lever. It is usually secured with a small clip or cotter pin. Remove it gently to avoid bending the rod.
Unmount the Carburetor
Remove the two 10mm mounting bolts. Gently wiggle the carburetor free from the intake manifold. If it sticks, double-check for missed connections before applying more force.
Disassemble the Carburetor Components
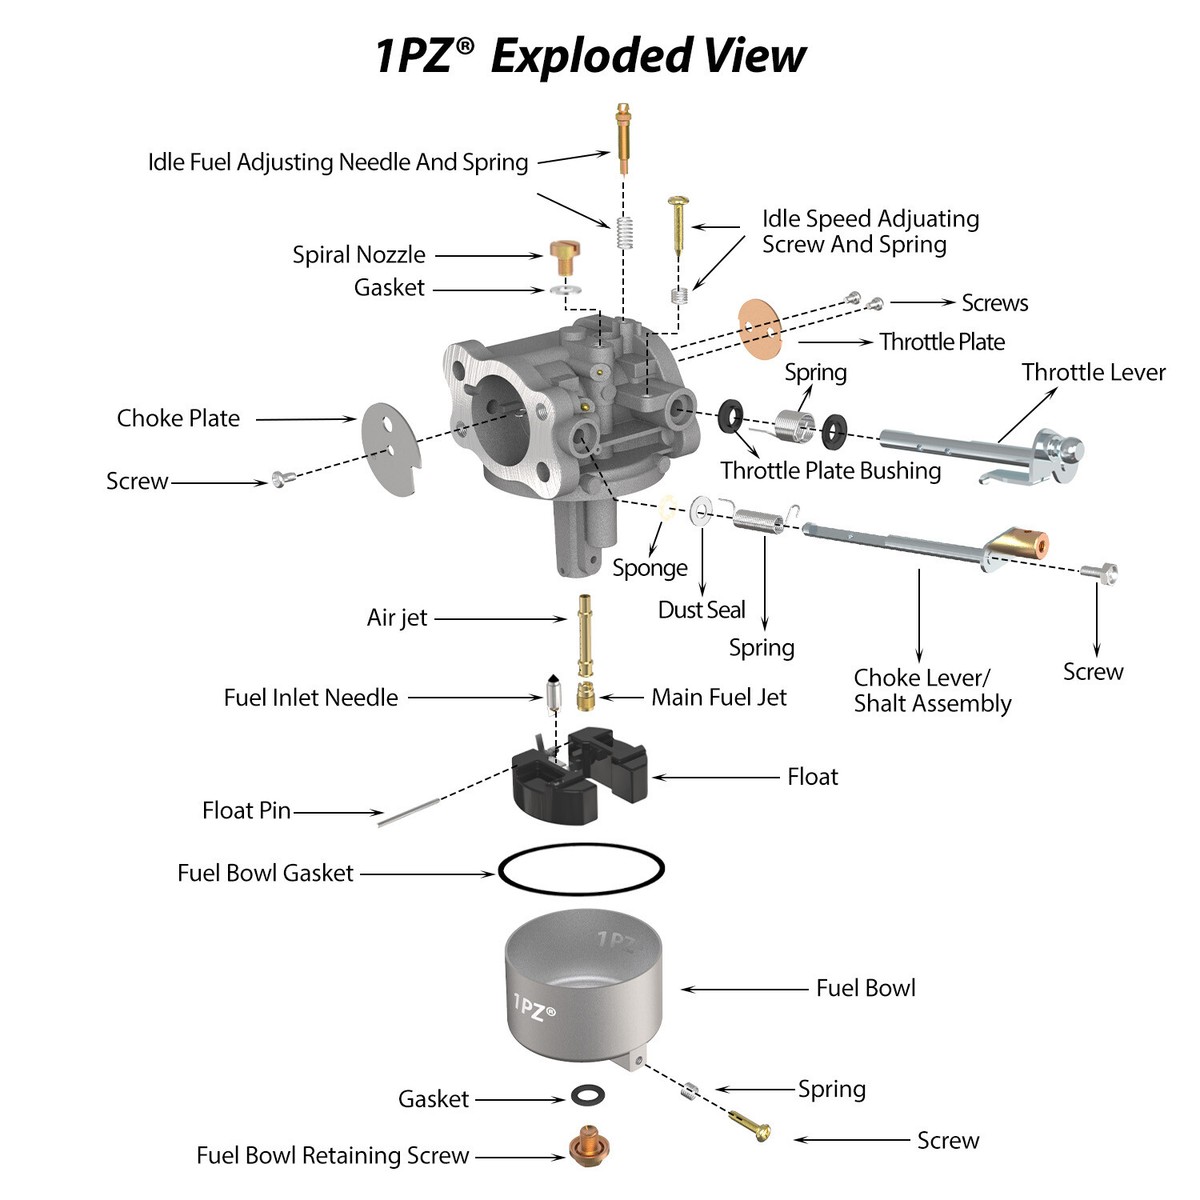
Take photos during disassembly to ensure correct reassembly later.
Remove the Float Bowl
Turn the carburetor upside down. Remove the bowl nut or screws securing the float bowl. Set aside the bowl, gasket, and any small parts like the jet or needle valve.
Extract the Jets and Needle Valve
Carefully remove the main jet and idle jet using a small wrench. Keep track of their positions since each jet is sized differently.
Inspect the Float and Needle
Check the float for cracks or fuel saturation. Shake it gently. If you hear liquid inside, replace it. Ensure the needle valve moves freely and is not stuck.
Clean Every Component Thoroughly
Use carburetor cleaner to dissolve varnish without disassembling further.
Soak and Spray Metal Parts
Place jets, the bowl, and other removable parts in a small container. Pour carburetor cleaner over them and let soak for 10 to 15 minutes. Spray cleaner directly into carburetor body passages, especially the throttle bore and fuel inlet.
Scrub Gently with a Brass Brush
Use a brass brush to scrub the float bowl and jets. Avoid steel brushes since they scratch aluminum parts. Focus on tiny holes in the jets, which must be fully clear.
Blow Out All Passages with Air
Use compressed air to blow through every fuel and air passage. Hold the carburetor securely and aim air into each orifice until clean and dry. This step is critical because clogged passages cause poor running.
Wipe Down the Exterior
Use a clean rag to wipe the carburetor body. Avoid leaving fibers in any openings.
Reassemble the Carburetor
Rebuild in reverse order of disassembly.
Replace Gaskets and Seals
Install a new float bowl gasket if your kit includes one. Old gaskets often warp and cause leaks.
Reinstall Jets and the Float
Screw the main and idle jets back in by hand, then tighten slightly with a wrench. Reattach the float and needle valve, ensuring the float pivots freely.
Reattach the Float Bowl
Secure the float bowl with the bowl nut or screws. Avoid overtightening, which can crack the bowl or distort the gasket.
Reinstall the Carburetor on the Engine
Carefully return the carburetor to its mounting position.
Align and Bolt Down
Slide the carburetor onto the intake manifold. Reinstall the two mounting bolts and tighten evenly to 8 to 10 ft-lbs. Uneven tightening can warp the base.
Reconnect All Lines and Linkage
- Reattach the fuel line and secure with the clamp
- Slide the air intake tube back on and tighten the clamp
- Reconnect the throttle linkage and secure the clip
Double-check that all connections are snug but not over-tightened.
Test Engine Operation After Reassembly
Reconnect the battery and restore fuel flow before starting.
Prime the Engine
Turn the fuel valve back to “On.” Let fuel fill the bowl, which may take about 30 seconds. Do not crank the engine repeatedly yet.
Start and Observe
Turn the key and let the engine start. It may take a few tries or run unevenly at first as fuel stabilizes.
Check for Leaks
Inspect the fuel line, bowl, and gasket areas for drips. Shut off immediately if you see fuel leaking.
Listen to Idle Quality
A clean carburetor should produce a smooth, steady idle. If the engine races or stalls, adjust the idle screw slightly clockwise to increase speed or counterclockwise to decrease it.
Troubleshoot Common Carburetor Issues
Even after cleaning, some problems may persist. Here is how to address them.
Engine Will Not Start
- Check fuel flow by disconnecting the fuel line briefly to confirm fuel squirts out
- Verify spark using a spark tester or grounded plug
- Inspect the air filter since a clogged filter restricts airflow
Rough Idle or Stalling
- Adjust the idle mixture screw 1/4 turn at a time until idle smooths
- Recheck jet cleaning, as a clogged idle jet causes hesitation at low speed
- Look for vacuum leaks by spraying carb cleaner around the carb base; engine RPM changes indicate a leak
Flooding or Gas Smell
- Replace the float needle if it allows too much fuel into the bowl
- Check float level, since a float sitting too high overfills the chamber
Prevent Future Carburetor Problems
Regular maintenance prevents repeat cleanings and costly repairs.
Use Fresh, Ethanol-Free Fuel
Ethanol attracts moisture and breaks down quickly. Use non-ethanol gas or add a fuel stabilizer like Sta-Bil every time you fill up.
Run the Engine Weekly
If your cart sits unused, start it and let it run for 10 to 15 minutes weekly. This keeps fuel circulating and prevents gum buildup.
Change the Fuel Filter Annually
A clogged filter strains the carburetor. Replace it every 12 months or 1,000 miles.
Install an Inline Fuel Shutoff
Add a manual shutoff valve to cut fuel when storing the cart for more than two weeks.
When to Replace Instead of Clean
Sometimes cleaning is not enough. Know when to upgrade.
Replace If:
- The casting is cracked or warped
- The throttle bore is excessively worn
- Multiple cleanings fail to restore performance
- Rebuild kits no longer fix leaks
OEM replacements for 2015 Yamaha carts are widely available and often cost less than $100.
Consider Performance Upgrades
A high-flow carburetor improves throttle response. For long-term reliability, some owners convert to electronic fuel injection (EFI) systems.
Frequently Asked Questions About Golf Cart Carburetor Cleaning
How often should I clean my golf cart carburetor?
Clean the carburetor annually or every 100 hours of use. Carts that sit unused for long periods may need more frequent cleaning.
Can I clean a carburetor without removing it?
Yes, you can spray carburetor cleaner into the air intake while the engine runs. However, removal provides a deeper clean and is recommended for heavy varnish.
What causes white smoke from a golf cart engine?
White smoke often indicates burning oil or unburned fuel. After carburetor cleaning, persistent smoke may point to a stuck float or leaking needle valve.
Is it safe to use carburetor cleaner on plastic parts?
Most carburetor cleaners can damage plastic or rubber components. Spray metal parts only and protect surrounding surfaces with a rag.
Do ethanol-free fuels really prevent carburetor issues?
Ethanol-free fuel reduces moisture absorption and varnish formation. It significantly extends the time between carburetor cleanings.
Key Takeaways for Golf Cart Carburetor Cleaning
A clean carburetor keeps your gas golf cart running smoothly, improves fuel efficiency, and extends engine life. For 2015 Yamaha and similar models, annual cleaning combined with fresh fuel and regular oil changes delivers peak performance. Start by gathering tools, following safety steps, and methodically disassembling each part. If problems persist after cleaning, inspect jets, floats, and gaskets before considering a full replacement. Take action today and your cart will reward you with reliable starts and smooth rides for seasons to come.