If your golf cart feels sluggish on hills or struggles to hold a charge, the batteries might not be to blame. The real culprit is often the golf cart battery wiring itself. Worn, undersized, or corroded cables restrict current flow, increase resistance, and drain efficiency before power even reaches the motor. In electric golf carts, every volt matters, so proper wiring is just as critical as the batteries themselves.
This guide covers everything you need to know about golf cart battery wiring, from selecting the correct gauge and measuring cable length to making secure connections that last. Whether you are replacing a single damaged cable or doing a complete rewire, the right approach restores performance and reliability.
Choose the Right Cable Gauge for Golf Cart Battery Wiring

Selecting the proper wire gauge is the first and most critical step in any golf cart battery wiring project. The gauge determines how much current the cable can safely carry while minimizing voltage drop.
Why Gauge Size Affects Performance
Larger cables (lower AWG numbers) offer less resistance, allowing more power to reach the motor. Factory-installed golf carts typically use 6 gauge (AWG) cables, which work well for standard operation. However, if you have upgraded your motor, added accessories, or simply want better performance, stepping up to 4 gauge or 2 gauge wiring delivers noticeable improvements
– 6 AWG: Standard factory size for basic use
– 4 AWG: Reduced heat, better output for modified carts
– 2 AWG: Maximum power delivery for high-draw systems
Smaller voltage drop means cooler-running cables and longer battery life, especially under heavy loads.
How to Decide Which Gauge You Need
Consider these questions before choosing:
– Is your cart stock or modified?
– Do you notice power loss on hills or during acceleration?
– Are your cables warm after use?
If you answered yes to the last two questions, upgrading to 4 or 2 gauge makes sense. While 6 AWG handles light use, 4 and 2 AWG cables provide headroom for future upgrades and improved efficiency.
Measure Each Cable Hole to Hole
Off-the-shelf kits assume a typical battery layout, but real-world setups vary, especially after battery replacements or reconfigurations.
Get Accurate Measurements
To ensure cables fit without strain:
1. Measure from center of terminal hole to center of terminal hole
2. Record each cable length individually, since series connections vary
3. Double-check polarity and routing path before cutting or ordering
Even a one-inch difference can cause tension, misalignment, or loose connections.
Account for Battery Layout Changes
Battery brands and terminal positions often change over time. A cable that fit five years ago might not fit today. Always measure your current setup instead of relying on old specs or generic kit lengths.
Choose Pure Copper Cables for Maximum Conductivity
Not all battery cables perform the same. Material and construction directly impact safety and output.
Avoid Copper-Clad Aluminum
Copper-clad aluminum (CCA) cables are cheaper but conduct significantly less current than pure copper. They also heat up faster and corrode more easily. Quality golf cart battery wiring uses 100% pure copper stranding for maximum conductivity and flexibility.
Extra Flexible Stranding Matters
Fine-stranded copper bends easily and resists vibration, which is critical in a moving vehicle like a golf cart. This flexibility reduces stress on terminals and prevents internal wire breakage over time.
Secure Connections with the Right Terminals

A great cable is only as good as its connection. Loose or corroded terminals lead to power loss and dangerous overheating.
Match the Terminal to the Stud
Most golf cart batteries use 5/16-inch terminal studs. Quality cables come with copper ring terminals that fit this standard perfectly. Verify that:
– Terminal fits snugly on the stud
– No frayed or loose strands are visible
– Full metal-to-metal contact is achieved
Use Adhesive-Lined Heat Shrink for Protection
Each connection should be sealed with adhesive-lined heat shrink tubing, which:
– Prevents moisture intrusion
– Stops corrosion at the terminal
– Adds strain relief to the cable
This protection far outperforms vinyl tape or standard shrink wrap.
Wire According to Your Battery Configuration
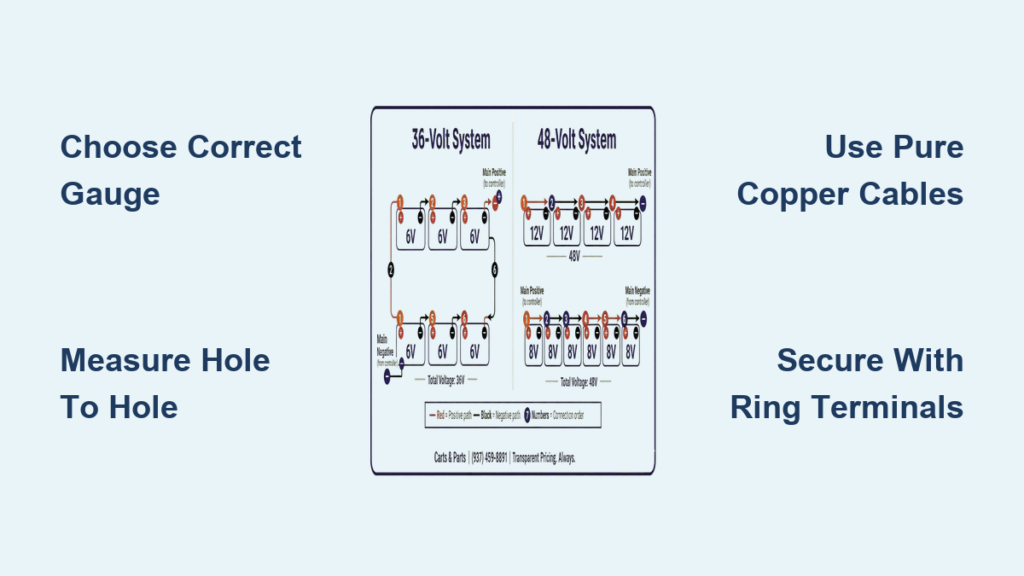
Golf cart battery wiring depends on your battery setup, typically 36V or 48V systems made from 6V, 8V, or 12V batteries connected in series.
36V System Wiring (6 x 6V Batteries)
Common in older carts, this setup uses six 6-volt batteries:
1. Connect batteries in series by linking negative to positive between each unit
2. Continue until the final negative terminal becomes the cart’s ground
3. Use consistent gauge throughout the entire pack
Both 6, 4, and 2 gauge cables work depending on your performance needs.
48V System Wiring (6 x 8V or 4 x 12V Batteries)
Modern and upgraded carts often run 48V systems:
– 6 x 8V: Same series wiring pattern as 6 x 6V, just higher voltage per battery
– 4 x 12V: Fewer connections but longer individual cables
All cables must be rated for 48V and matched in length and gauge.
Series vs. Parallel at a Glance
- Series: Increases voltage (6 x 8V = 48V), used to power the motor
- Parallel: Increases capacity (Ah), used to extend runtime
Golf carts rely on series wiring for the main battery pack. Mixing the two approaches only applies to advanced dual-bank systems.
Replace Cables One at a Time When Possible
If only one cable is damaged, a full rewire is not necessary.
When Single Replacement Works
Replace a single cable if:
– Only one shows corrosion or physical damage
– You are upgrading cable gauge gradually
– Budget is limited
Match the new cable to the existing gauge and length for balanced performance.
Follow Standard Color Coding
Stick to common color practices:
– Red: Positive cables
– Black or white: Negative cables
Color coding prevents costly mistakes during future maintenance.
Upgrade Your Golf Cart Battery Wiring for Better Performance
Even functional wiring can benefit from an upgrade.
Benefits of 4 or 2 Gauge Upgrades
- Lower resistance: More power reaches the motor
- Cooler operation: Less heat buildup under load
- Longer cable life: Reduced stress and oxidation
- Better hill climbing: Less voltage sag when it matters
Many users report improved acceleration and range after switching from 6 AWG to 4 or 2 AWG.
When a Complete Rewire Makes Sense
Consider a full rewire if:
– Cables are over 3 to 5 years old
– You see corrosion, brittleness, or discoloration
– You have upgraded batteries or the motor
– Performance has noticeably dropped
New high-quality cables can restore your cart’s original power.
Troubleshoot Common Golf Cart Battery Wiring Problems

Poor wiring causes many symptoms that are often mistaken for battery or motor failure.
Voltage Drop Under Load
Common signs include the cart slowing on hills, the motor cutting out briefly, or cables feeling warm after use. Check the cable gauge, terminal tightness, and look for corrosion. Use a multimeter to compare voltage at the motor versus the battery pack during operation.
Intermittent Power Loss
Loose ring terminals, broken internal strands, or corroded connections hidden under insulation are typical culprits. Inspect each connection point and perform a wiggle test with the cart powered off.
Overheating Cables
Warm cables signal undersized wiring, poor connections, or mixed gauges in the same circuit. Replace with larger gauge cable and ensure every terminal is clean and tight.
Frequently Asked Questions About Golf Cart Battery Wiring
What gauge wire is best for golf cart batteries?
Most factory carts use 6 AWG, which is sufficient for stock systems. For modified carts or better performance, 4 AWG or 2 AWG cables are ideal because they reduce resistance and voltage drop.
How do I measure golf cart battery cables?
Measure from the center of one terminal hole to the center of the next for each cable. Series connections vary in length, so measure each one individually rather than relying on generic kit sizes.
Can I replace just one golf cart battery cable?
Yes. If only one cable is damaged or corroded, you can replace it individually. Just match the gauge and length to the rest of your wiring for consistent performance.
What is the difference between series and parallel wiring?
Series wiring increases voltage (used to power the motor), while parallel wiring increases capacity or runtime. Golf carts use series wiring for the main battery pack.
Why are my golf cart cables getting hot?
Hot cables usually indicate undersized wiring (such as 6 AWG on a 48V high-draw system), loose terminals, or mixed cable gauges. Upgrade to a larger gauge and clean all connections.
Are 5/16 ring terminals standard for golf cart batteries?
Yes. Most golf cart batteries use 5/16-inch terminal studs, so ring terminals should match this size for a secure, metal-to-metal connection.
Key Takeaways for Better Golf Cart Battery Wiring
Proper golf cart battery wiring is the backbone of reliable cart performance. Start by choosing the right gauge, whether that is 6 AWG for stock systems or 4 or 2 AWG for upgraded carts. Always measure hole to hole, use pure copper cables, and seal every connection with adhesive-lined heat shrink tubing.
If your cart struggles with power, range, or hill climbing, inspect the wiring before replacing batteries. Measure your existing cables today and consider upgrading to a thicker gauge to unlock better acceleration, cooler operation, and longer battery life.