Standing just off the green with a delicate shot ahead can rattle even seasoned players. The ball sits in thick rough, the pin is tucked tight against a bunker, and one poor strike means adding a stroke to your card. Mastering how to chip and pitch in golf transforms these pressure moments into scoring opportunities. Your short game ultimately controls your scorecard more than your driving distance ever will.
This guide breaks down the precise mechanics, setup adjustments, and club choices that separate confident players from frustrated ones. You will learn how to read lies, select the right loft, and execute strikes that land the ball exactly where you intend. Whether you face a downhill lie, fluffy rough, or a tucked pin, these techniques will help you save strokes consistently.
Distinguish Chip Shots From Pitch Shots
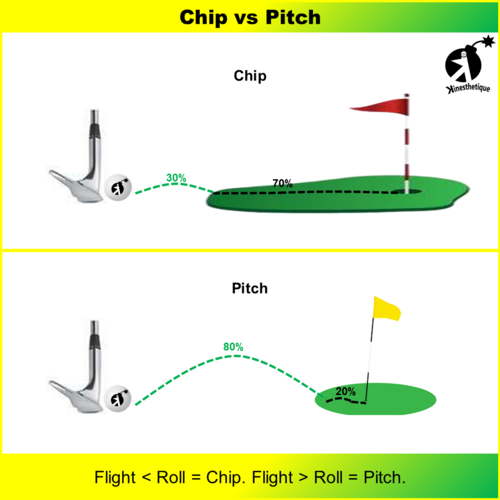
Before swinging a club, you must identify which shot your situation demands. Confusing a chip for a pitch causes players to fly the ball over the green or leave it woefully short. The primary differences lie in the air-to-roll ratio and the clubface orientation at impact.
Analyze the Air-to-Roll Ratio
The fundamental rule for how to chip and pitch in golf revolves around how much time the ball spends airborne versus on the ground. A chip shot spends roughly 10% of its travel time in the air and 90% rolling. You use this when you have a clear path to the hole and want the ball to behave like a putt once it lands. Conversely, a pitch shot spends 50% to 80% of its distance airborne. You need this higher trajectory when carrying over bunkers, rough, or other obstacles where rolling is not an option.
Evaluate the Lie and Surrounding Obstacles
Your decision-making process starts by examining the grass beneath your ball and the terrain ahead. If the ball sits in fluffy rough, a chip becomes risky because grass can twist the clubface and cause mis-hits. A pitch with an open face helps slide under the ball in this scenario. If you have a tight lie with no obstacles, a chip minimizes error by keeping the trajectory low and letting the green’s contour do the work.
Select the Appropriate Lofted Club
Club selection changes dramatically between these two shots. For chipping, you generally want less loft to keep the trajectory low. A 7-iron, 8-iron, or pitching wedge works well for running the ball out. When pitching, you need maximum loft to generate height and spin. A sand wedge, lob wedge, or high-lofted specialty wedge becomes necessary for stopping the ball quickly on the green.
Master the Chipping Technique
Chipping is often described as “putting with an iron,” but it requires specific adjustments to achieve consistent contact. The goal is to strike the ball with a descending blow, compressing it slightly against the turf to start it rolling end-over-end.
Establish a Narrow Stance Width
Your stability must be rock solid when chipping. Start by narrowing your stance so your feet sit only hip-width apart or even closer. This restricted base limits lower body movement and forces your arms and shoulders to control the swing. Place slightly more weight, about 60-70%, on your lead foot. This forward weight bias ensures you hit down on the ball rather than scooping it upward, which causes thin or fat contact.
Position the Ball Back in Your Stance
Ball position is critical when learning how to chip and pitch in golf effectively. For a chip, place the ball back in your stance, aligned with your back foot or just inside your right heel. This positioning ensures the clubhead strikes the ball before reaching the lowest point of the swing arc. Contacting the ball on the downswing creates the downward pressure needed to pop the ball up slightly and get it rolling immediately.
Execute a Pendulum Shoulder Motion
Power for a chip comes from shoulder rotation, not wrist action. Imagine your arms and club forming a triangle that remains intact throughout the swing. Rock your shoulders back and through while keeping your wrists firm. A good mental cue is to keep your hands quiet; if your wrists hinge or break down, you lose control over the clubface angle. The follow-through should match the length of your backswing to maintain rhythm.
Control Distance With Swing Length
Unlike full swings where speed generates power, distance control in chipping comes from backswing length. For a short chip, take a small backswing; for a longer chip, extend the backswing slightly while maintaining the same tempo. Practice varying your backswing length while keeping acceleration smooth to master distance calibration across different scenarios.
Perfect the Pitching Motion
Pitching requires a more dynamic approach than chipping, involving more wrist hinge and a steeper angle of attack. The objective is to lift the ball into the air with enough spin to stop it quickly upon landing.
Widen Your Stance for Stability
While chipping uses a narrow stance, pitching benefits from a slightly wider base, roughly shoulder-width apart. This provides the stability needed to handle the aggressive downward strike required for a pitch. Like with chipping, favor your lead foot with about 60% of your weight. This forward lean helps ensure a crisp strike and prevents falling back on your trailing foot.
Hinge Your Wrists Early in the Backswing
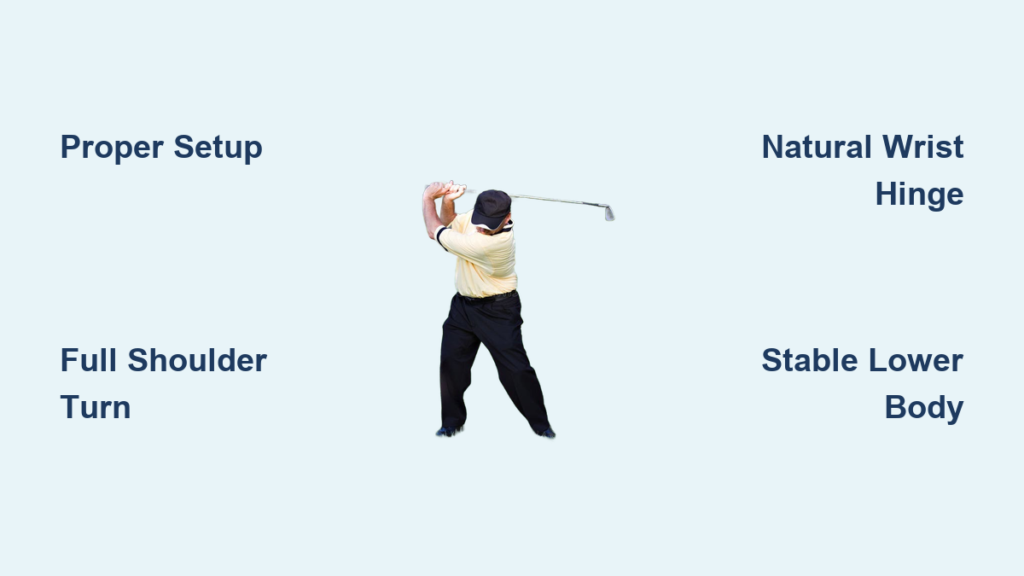
The defining characteristic of a good pitch is early wrist hinging. As you take the club back, allow your wrists to cock upward quickly, creating a steep angle between your lead arm and the club shaft. This “L” shape stores energy that releases through the ball, generating the lift and spin necessary for a high trajectory. Think of the motion as throwing the clubhead up and over the ball rather than sweeping it along the ground.
Strike Down and Through the Ball
To get the ball up, you must hit down. This counter-intuitive concept is central to how to chip and pitch in golf. Aim to strike the ball first, then the turf. The club should dig slightly into the ground after contact, taking a small divot. If you try to help the ball into the air by lifting your body or scooping with your hands, you will likely hit the ball fat or thin. Trust the loft of the wedge to lift the ball while delivering a descending blow with speed.
Follow Through High and Full
A common mistake in pitching is decelerating through impact. To generate enough spin and height, you must accelerate through the ball. Your follow-through should be high, with your hands finishing near your chest or shoulder level. A full, confident follow-through ensures the clubface remains square through impact and imparts maximum backspin.
Adjust Your Setup for Challenging Variables
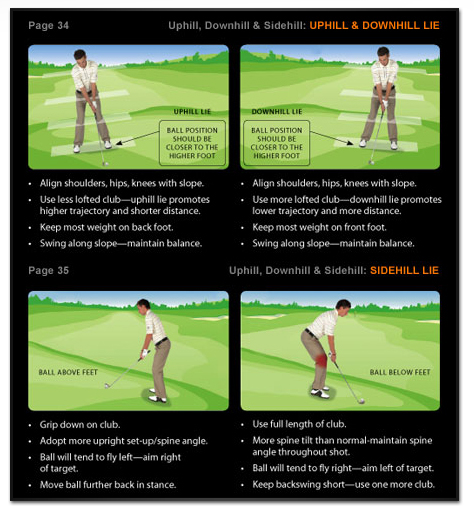
No two shots are ever exactly alike. The ability to adjust your setup based on the lie, slope, and conditions separates average golfers from skilled ones.
Handle Uphill and Downhill Lies
Slope changes everything in the short game. When facing an uphill lie, your body naturally wants to lean back. Counteract this by leaning your shoulders parallel to the slope and placing more weight on your lower foot. The ball flies higher and shorter from uphill lies, so club up and aim slightly right. On a downhill lie, lean your shoulders with the slope, keep weight on your lead foot, and expect the ball to come out lower and run further. Use less loft and aim left to compensate.
Play From Tight Versus Fluffy Lies
The condition of the grass under your ball dictates your margin for error. From a tight lie, you have very little room for error; hitting slightly behind the ball causes it to skid. Here, a chip is often safer than a pitch. From a fluffy lie, grass can get between the clubface and ball, reducing spin and control. In this scenario, open your clubface more and strike slightly more aggressively to reach the ball before the grass interferes.
Account for Wind Conditions
Wind plays a massive role in shot selection and execution. Into a headwind, a high pitch can balloon and stop short or drift offline. In these conditions, opt for a lower trajectory chip or a “bump and run” style pitch with less wrist hinge. With a tailwind, the ball carries further and rolls more, so club down or reduce your swing length. Crosswinds require you to aim into the wind and let the ball drift back, or choose a lower shot less affected by the breeze.
Troubleshoot Common Short Game Errors
Even with good intentions, execution can falter. Identifying the root cause of missed shots accelerates improvement.
Fix Fat and Thin Strikes
Hitting the ground before the ball (fat) or striking the top of the ball (thin) are the most frustrating errors. Fat shots usually happen when too much weight sits on the back foot or the head lifts prematurely. Ensure your weight stays forward and your eyes remain fixed on the back of the ball until well after impact. Thin shots often result from trying to lift the ball or standing too tall. Maintain your spine angle and trust the loft of the club.
Correct a Lack of Backspin
If your pitch shots land and roll out like chips, you likely lack backspin. This stems from insufficient acceleration through the ball or failing to strike cleanly. Ensure you hit the ball first, then the turf. Check your grip pressure; gripping too tightly tenses your forearms and prevents proper wrist hinge. A smooth, accelerating strike with clean contact produces the spin you need.
Eliminate Chunky Chip Shots
A chunky chip occurs when the club digs into the ground well behind the ball. This is almost always a weight distribution issue. If you feel yourself falling back during the swing, you will hit behind the ball. Drill the feeling of keeping your chest over the ball throughout the motion. Visualize striking the front quadrant of the ball to improve contact quality.
Practice Drills That Build Consistency

Improving your short game requires deliberate practice. Random hitting is less effective than structured drills that isolate specific mechanics.
Use the Coin Drill for Cleaner Contact
Place a coin on the practice green and try to hit the coin with your clubhead, sending it toward the target. Alternatively, place the ball next to a tee and focus on missing the object while hitting only the ball. This drill forces precision with your low point and encourages a descending blow, building confidence in clean contact.
Implement the Ladder Drill for Distance Control
Distance control is vital when learning how to chip and pitch in golf. Set up three targets at 10, 20, and 30 feet away. Practice landing the ball within a three-foot circle of each target, working from closest to farthest. This helps calibrate your swing length to specific distances, developing feel for different shot requirements.
Try the One-Handed Pitch for Better Feel
To improve wrist hinge and overall feel, try hitting pitch shots using only your lead hand. This forces body rotation and prevents over powering the shot with your trailing hand. Once you make solid contact with one hand, switch to two hands and notice the greater sense of control and fluidity in your motion.
Select Clubs Strategically Around the Green
Club selection is a strategic decision that simplifies your short game. Knowing which tool to use reduces complexity and increases success.
Match the Club to Your Landing Zone
The golden rule of club selection is to pick the club that lets you land the ball on the flattest, safest part of the green. If the pin sits close to the edge, you need a high-lofted wedge to stop the ball quickly. If the pin centers with plenty of room, a lower-lofted iron takes the guesswork out of the swing. Maximize roll where possible since rolling the ball is more predictable than flying it.
Understand Wedge Bounce Options
Different wedges come with different bounce angles, affecting how the club interacts with turf. High bounce wedges work well in soft sand or fluffy rough, preventing the club from digging too deep. Low bounce wedges suit tight lies and firm ground, allowing you to get under the ball without the leading edge bouncing up. Knowing your wedge bounce helps you match the tool to the lie.
Carry Multiple Loft Options
Having multiple lofts in your bag provides flexibility around the green. A standard setup includes a pitching wedge (46-48 degrees), gap wedge (50-52 degrees), sand wedge (54-56 degrees), and lob wedge (58-60 degrees). This progression lets you fine-tune distance and trajectory for every situation you encounter.
Frequently Asked Questions About Chipping and Pitching
What is the main difference between a chip and a pitch in golf?
A chip shot travels about 10% in the air and 90% on the ground, using less lofted clubs like 7-iron or 8-iron. A pitch shot spends 50-80% airborne, requiring wedges like sand or lob wedges to clear obstacles and stop quickly on the green.
What stance width should I use for chipping versus pitching?
For chipping, narrow your stance to hip-width or closer to restrict lower body movement. For pitching, widen your stance slightly to shoulder-width for greater stability when making a steeper, more aggressive swing.
Where should I position the ball in my stance for these shots?
Place the ball back in your stance near your back foot for chipping. For pitching, position the ball slightly more centered but still favoring the back portion of your stance to ensure a descending strike.
How do I fix hitting chip shots fat or thin?
Focus on keeping your weight forward on your lead foot and maintaining your spine angle throughout the swing. Keep your eyes on the back of the ball until after impact, and trust the loft of the club rather than trying to lift the ball with your hands.
Can I pitch with a 9-iron instead of a wedge?
You can pitch with a 9-iron for lower trajectories, especially in windy conditions or when you need more roll. However, you sacrifice height and spin, making it harder to stop the ball quickly on the green.
How often should I practice chipping and pitching?
Short game skills benefit most from frequent, focused practice. Even 15 minutes per session hitting varied lies and distances produces better results than occasional long practice sessions.
Final Takeaways for Mastering Chipping and Pitching
Understanding how to chip and pitch in golf comes down to three core principles: choosing the right shot for the situation, executing sound mechanics, and practicing with purpose. Distinguish between chips and pitches by evaluating your lie, obstacles, and desired air-to-roll ratio before every shot.
Commit to a practice routine that includes contact drills, distance control work, and varied lies. Focus on keeping your weight forward, hinging your wrists early for pitches, and maintaining a quiet lower body for chips. Trust your club selection, visualize the entire ball path, and commit fully to each shot without hesitation.
Your next step is simple: head to the practice green with three or four clubs and a clear plan. Spend one session on contact drills, another on distance control, and a third on simulating real playing conditions. Consistent, deliberate practice transforms the area around the green from a source of anxiety into your greatest scoring advantage.