You plug in your Pro 4, wait for the familiar hum, and get absolutely nothing. No lights, no click, no charging sound. If your golf cart will not charge, the problem usually traces back to one of a handful of common culprits. Most owners can diagnose and fix these themselves using basic tools and about 30 minutes of troubleshooting.
This guide walks you through every major cause of charging failure on a Pro 4 model, from dead outlets to failed control modules. You will learn how to test your charger, check battery health, inspect the charging port, and know exactly when to stop and call a technician. By the end, you will have a clear action plan to get your cart charging again.
Confirm the Charger Is Receiving Power
Before testing anything on the cart, verify the wall outlet actually has power. A tripped GFCI outlet or a tripped breaker can silently cut electricity to your charger, making it look like the unit has failed.
Test the Outlet With Another Device
Grab a lamp, phone charger, or any small appliance and plug it into the same outlet. If the device does not power on, you have an outlet issue, not a cart issue. Walk to your breaker panel and look for any switches sitting in the middle or off position. Flip the corresponding breaker fully off, then back on.
Pro Tip: Avoid running your golf cart charger through an extension cord. Long or undersized cords drop voltage below what the charger needs, which prevents it from starting or causes early shutdowns.
Listen and Watch for Charger Response
After confirming the outlet works, plug the charger in by itself (not connected to the cart yet). A healthy charger usually displays an LED light, fans spinning, or a faint hum within 5 to 10 seconds. If you see no signs of life, the charger itself may be dead.
Test Charger Output With a Multimeter
A charger can have indicator lights and still produce zero output. The only reliable way to confirm the charger works is to measure its DC voltage with a multimeter.
Measure Voltage at the Charger Plug
Set your multimeter to DC volts. Plug the charger into a working outlet and let it run for about 30 seconds. Touch the red probe to the positive pin inside the charger plug and the black probe to the negative pin.
Expected readings for a Pro 4 system:
– 48V system: 54V to 58V DC output
– 36V system: 42V to 44V DC output
If your reading is zero or significantly below the expected range, the charger has failed internally. At this point, your options are to replace the charger or test it against a known-good unit. Internal circuit board failures are not user-repairable.
Inspect the Cart’s Charging Port

The charging port on your golf cart takes abuse from weather, debris, and frequent plugging. A single bent pin or layer of corrosion can break the electrical connection entirely.
Look for Visible Damage
Use a flashlight to examine the inside of the port closely. Look for bent or recessed pins, green or white corrosion buildup, burn marks, melted plastic, or dirt packed inside. Even a thin film of oxidation can block charging current.
Clean the Port Without Causing Harm
If you spot debris or light corrosion, clean the port carefully. Unplug the charger and turn off the cart first. Blow out loose debris with compressed air. For stubborn dirt, gently scrub the contacts with a clean, dry toothbrush. If corrosion is present, spray a small amount of electrical contact cleaner onto the contacts and let it evaporate fully before reconnecting.
Warning: Never insert metal tools into the port. The contacts bend easily, and a broken pin means replacing the entire port assembly.
Reset the Charger and Cart System
Chargers contain microprocessors and capacitors that occasionally lock up after power surges or thermal events. A hard reset often clears these glitches and restores normal function.
Perform a Full System Reset
Unplug the charger from both the wall outlet and the golf cart. Wait a full 10 minutes to allow internal capacitors to discharge completely. During this time, also turn off the cart’s key switch. After 10 minutes, plug the charger into the wall outlet first, then connect it to the cart.
Listen for a click, watch for indicator lights, and wait 30 seconds. Many chargers have built-in thermal protection. If the unit recently overheated, it may need 20 to 30 minutes to cool before it will restart.
Test Each Battery’s Voltage
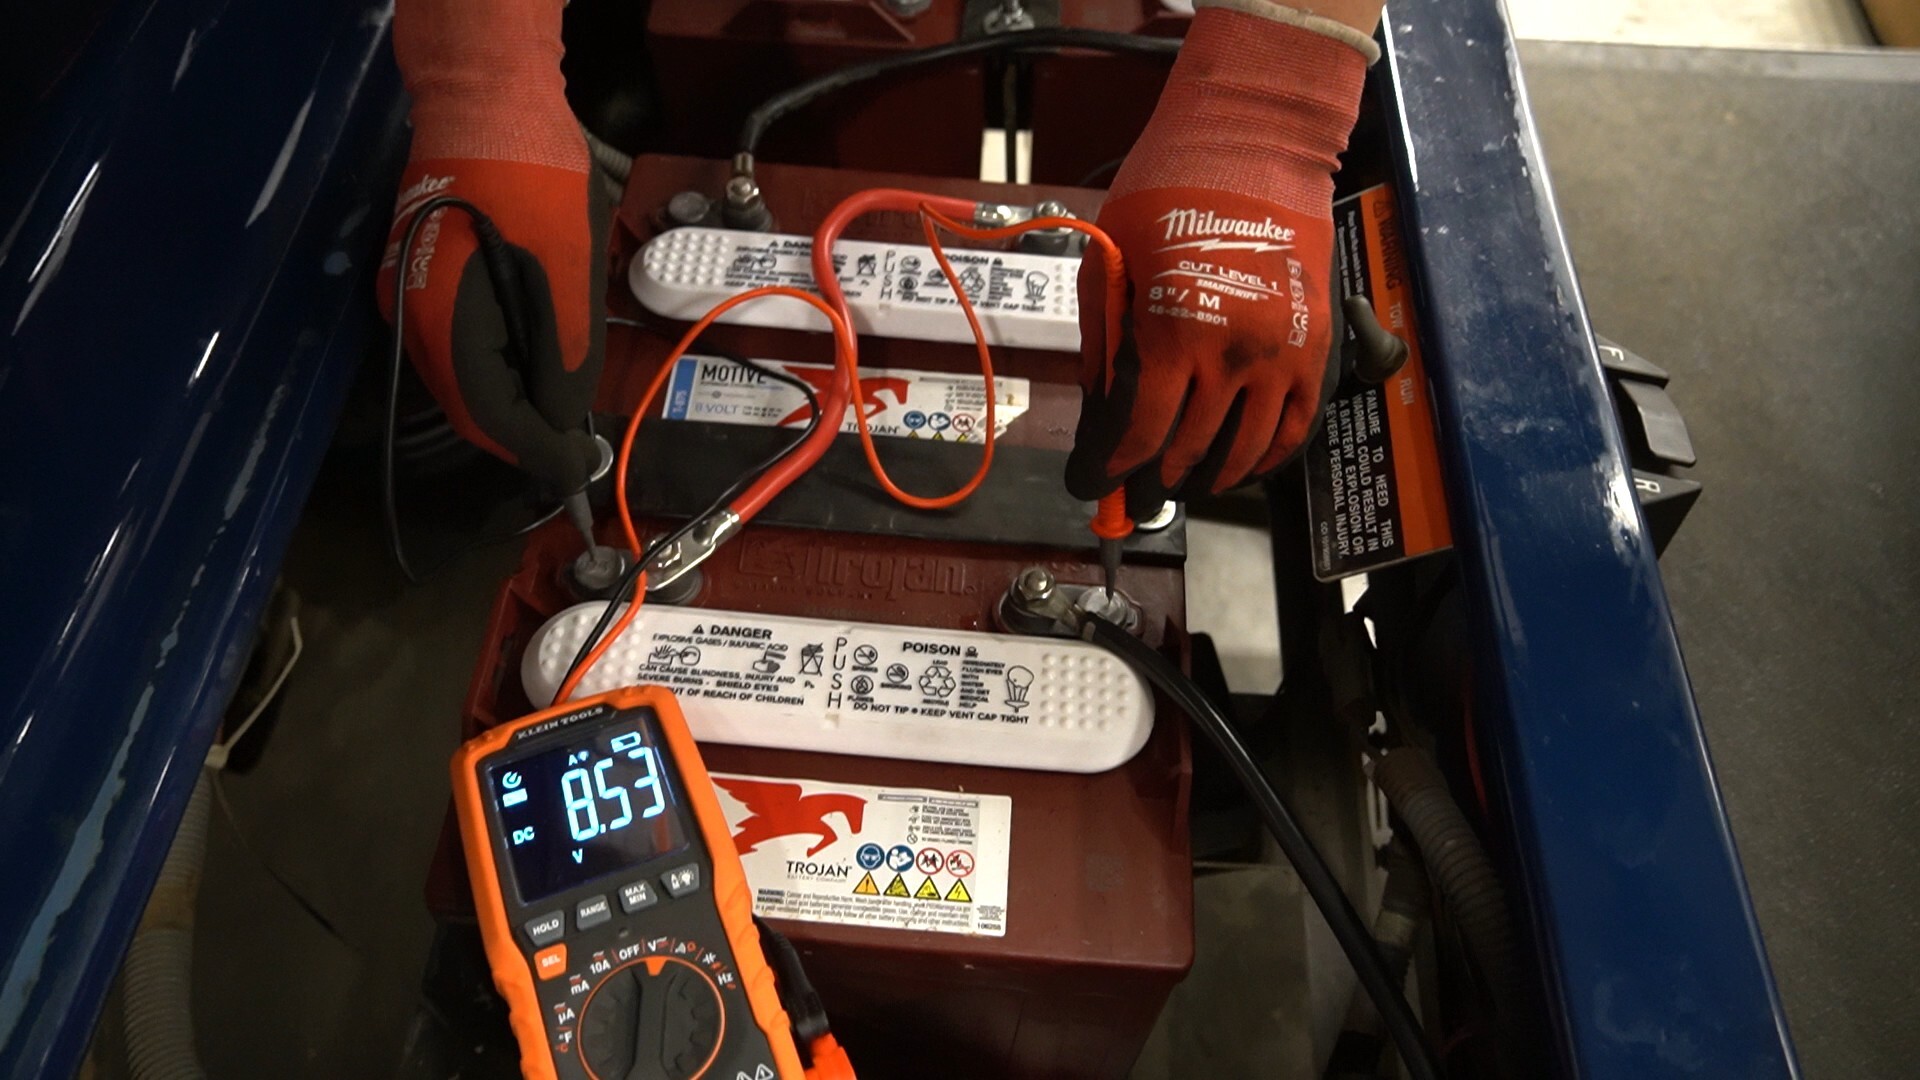
Weak or dead batteries can prevent a charger from starting, even when the charger and cables are perfectly fine. Modern chargers refuse to engage when they detect voltage below a safe threshold, which protects both the charger and the battery pack.
Check Individual Battery Health
Turn off the cart and disconnect the charger. Set your multimeter to DC volts and touch the probes to the positive and negative terminals of each battery. Record every reading.
Healthy resting voltages:
– 6V battery: 6.3V to 6.4V
– 8V battery: 8.4V
– 12V battery: 12.6V to 12.8V
Identify a Failed Battery
One weak battery can drag down the entire pack and stop charging completely. Watch for these warning signs:
– Voltage reading below 5V on a 6V battery
– Swollen or bulging battery sides
– Acid leaks or heavy terminal corrosion
– Zero voltage reading
Replace any failed battery right away. Never install a single fresh battery into a pack of old ones. Mismatched batteries cause chronic charging problems and shorten the life of every battery in the pack.
Verify Charger Compatibility
Using the wrong charger is a surprisingly common cause of no-charge symptoms. Pro 4 carts require specific voltage, amperage, and communication protocols to charge properly.
Match the Charger Specs to Your Cart
Check your owner’s manual or the label on your old charger for these specs:
– Input voltage: 110V to 120V AC (standard household)
– Output voltage: Must match your battery pack (48V for most Pro 4 models)
– Output amperage: Typically 15A to 20A
– Connector type: Must physically fit your cart’s port
A 36V charger connected to a 48V system will not charge the batteries. Some incompatible chargers may also fail to communicate with the cart’s onboard computer, resulting in no activity even when power is present.
Check the Main Fuse and Power Switch

A blown fuse or a switch left in the wrong position can cut the charging circuit completely. These checks take only a few minutes and often solve the problem.
Inspect the Main Fuse
The main fuse on most Pro 4 models is located near the battery pack or the controller. It is usually a large cylindrical or blade-style fuse rated between 100A and 300A. Turn off the cart and disconnect the battery pack before inspecting. Remove the fuse and look for discoloration, a melted appearance, or a broken internal filament. Test for continuity with your multimeter. If the fuse is blown, replace it with one of the exact same rating.
Warning: A blown fuse usually indicates a deeper problem, such as a short circuit or overload. If the new fuse blows immediately, stop and call a professional.
Verify Switch Positions
Make sure the key switch is fully off. Many carts will not charge unless the key is removed. Also, check the Run/Tow switch if your cart has one. The switch must be in the Run position. Many owners accidentally leave the cart in Tow mode after maintenance, which disables charging entirely.
Know When the Problem Is the BMS or Controller
If you have tested the charger, outlet, batteries, port, and fuses and everything checks out, the issue likely lies in the Battery Management System (BMS) or the motor controller. These components manage communication between the charger and the battery pack.
Recognize the Warning Signs
The BMS monitors voltage, temperature, and charge state. When it detects a fault, it blocks current flow and prevents charging. Symptoms include:
– Charger light blinks or shows an error code
– No response from the cart when plugged in
– Cart runs but shuts down unexpectedly
The motor controller handles power distribution. A failed controller may prevent the charger from recognizing the cart at all.
These components require specialized diagnostic equipment and technical expertise. If you suspect BMS or controller failure, stop troubleshooting and contact a qualified golf cart technician. Attempting repairs on these systems can cause permanent damage or create safety hazards.
Prevent Charging Problems Before They Start
Once your cart is charging again, a few simple practices will keep it that way.
Build Better Charging Habits
- Plug in the charger after every use, even short trips
- Avoid deep discharges below 50% battery capacity
- Use only the OEM charger or a high-quality compatible unit
- Leave the cart plugged in during long-term storage
Schedule Routine Maintenance
Every 3 to 6 months, spend 30 minutes on these tasks:
– Clean battery terminals with a baking soda and water solution
– Check water levels in flooded lead-acid batteries
– Inspect all cables for fraying, cracking, or looseness
– Tighten all terminal connections to manufacturer torque specs
Pro Tip: Keep a simple log of battery voltages after each charge. Sudden drops between sessions signal early battery failure, giving you time to replace batteries before they leave you stranded.
Frequently Asked Questions About Golf Cart Charging Problems
Why Is the Charger Light Not Coming On at All?
A completely dead charger light usually points to one of three issues: no power reaching the outlet, a failed charger, or a tripped safety lockout due to a battery or wiring fault. Start by testing the outlet with another device, then test the charger’s output voltage with a multimeter.
Can a Bad Battery Prevent Charging Entirely?
Yes. Modern chargers refuse to engage when they detect voltage below a safe threshold. If even one battery in your pack reads significantly below the others, the charger may interpret this as a fault and refuse to start. Test all of them individually to identify any weak cells.
How Long Does a Hard Reset Take to Work?
A proper hard reset requires unplugging the charger from both the wall and the cart for at least 10 minutes. This allows internal capacitors to fully discharge and clears locked error states. After reconnecting, wait 30 seconds before expecting any response.
Is It Safe to Use a Universal Golf Cart Charger?
Universal chargers can work, but cheap or poorly designed units often lack the communication protocols your cart’s BMS requires. Stick with OEM chargers or reputable brand-name alternatives specifically listed as compatible with your Pro 4 model.
What Does It Mean When the Charger Clicks but Does Not Start?
A clicking sound without full startup usually means the charger is receiving power but detecting a fault somewhere in the system. Common causes include low battery voltage, a failed BMS, or a broken connection at the charging port. Test each component in order until you find the trigger.
Final Takeaways for Fixing a Pro 4 That Will Not Charge
Most charging failures trace back to one of five root causes: a dead outlet, a failed charger, a damaged charging port, weak batteries, or a blown fuse. By working through these checks in order, you can diagnose the problem in under an hour without special equipment.
If every test passes and your golf cart still will not charge, the issue is almost certainly inside the BMS or controller. These systems need professional diagnostics and repair. Continuing to troubleshoot at this point risks damaging expensive components.
Your next step: Grab a multimeter and start with the outlet. In most situations, you will find your answer within the first three checks.