You just unboxed your new theHANGER training tool and you’re staring at the green impact bar, wondering where exactly it goes. Does it clamp to the hosel? Should the bar point down the target line? And what club should you start with? Getting the setup wrong wastes practice sessions and reinforces bad habits instead of fixing them.
This guide walks you through every step of installing theHANGER golf swing aid correctly. You’ll learn which club to choose first, how to attach the impact bar, how to verify your setup, and how to start your first practice session the right way. By the end, you’ll be swinging with confidence and getting real feedback from your very first rep.
Choose the Right Club for Your First Install
Your first installation sets the tone for every drill that follows. Start smart and your feedback will be accurate from day one.
Start With a Mid to Short Iron
Pick a 7, 8, or 9 iron as your first install. These clubs have a steeper shaft angle and more upright lie, making it easier to see and feel theHANGER in action. The shorter length also lets you focus on mechanics without fighting extra leverage.
Skip the Woods and Putter at First
Avoid installing theHANGER on a driver, fairway wood, or putter during your initial sessions. Their different lengths, lie angles, and swing arcs can distort the feedback signal. Master the basics on irons first, then expand your training set later.
Confirm Your Club Is Clean and Ready
Wipe down the hosel area before attaching anything. Dirt, moisture, or grass debris prevents the clamp from gripping securely and can cause the bar to shift mid-swing.
Attach the Impact Bar to the Hosel
The green impact bar is the heart of theHANGER system. Installing it correctly is what makes the feedback accurate.
Connect the Impact Bar to the Club Face
Place your club flat on the ground with the face square. Connect the club head with the green impact bar so it sits parallel to the club face and points directly down your intended target line. This alignment mirrors the ideal swing plane at address.
Slide the Clamp Over the Hosel
Slide the clamp over the hosel, fitting it just above the shaft and below where the club head begins. The fit should feel snug with no wobble. The clamp is designed for standard iron hosels and grips firmly when properly seated.
Tighten Both Screws Until Secure
Use the included hex key to tighten both screws on the clamp. Apply firm pressure but stop short of over-tightening. TheHANGER must remain fixed in place throughout your swing, since any rotation destroys the accuracy of the feedback.
Warning: A loose clamp leads to false feedback and can scratch your hosel over time.
Set the Club Face and Grip for Accurate Feedback

Once the bar is mounted, your setup posture determines how clean your training will be.
Set the Club Face Flat and Parallel
Rest the club on the ground with the sole flat and the face square. The green impact bar should hover just above the turf, aligned with your target line. If the bar drags on the ground or angles outward, reset the club face before continuing.
Use a Neutral Grip
Adopt a neutral grip with your hands square and the Vs between thumb and index finger pointing toward your trail shoulder. This neutral position ensures theHANGER trains the correct hand path and swing plane relationship.
Adjust Slightly for Personal Preference
TheHANGER can be adjusted based on personal preference once you master the standard setup. Players with a stronger grip might tilt the bar a few degrees closed, but make these tweaks only after you have logged solid reps in the neutral position.
Run a Static Setup Check
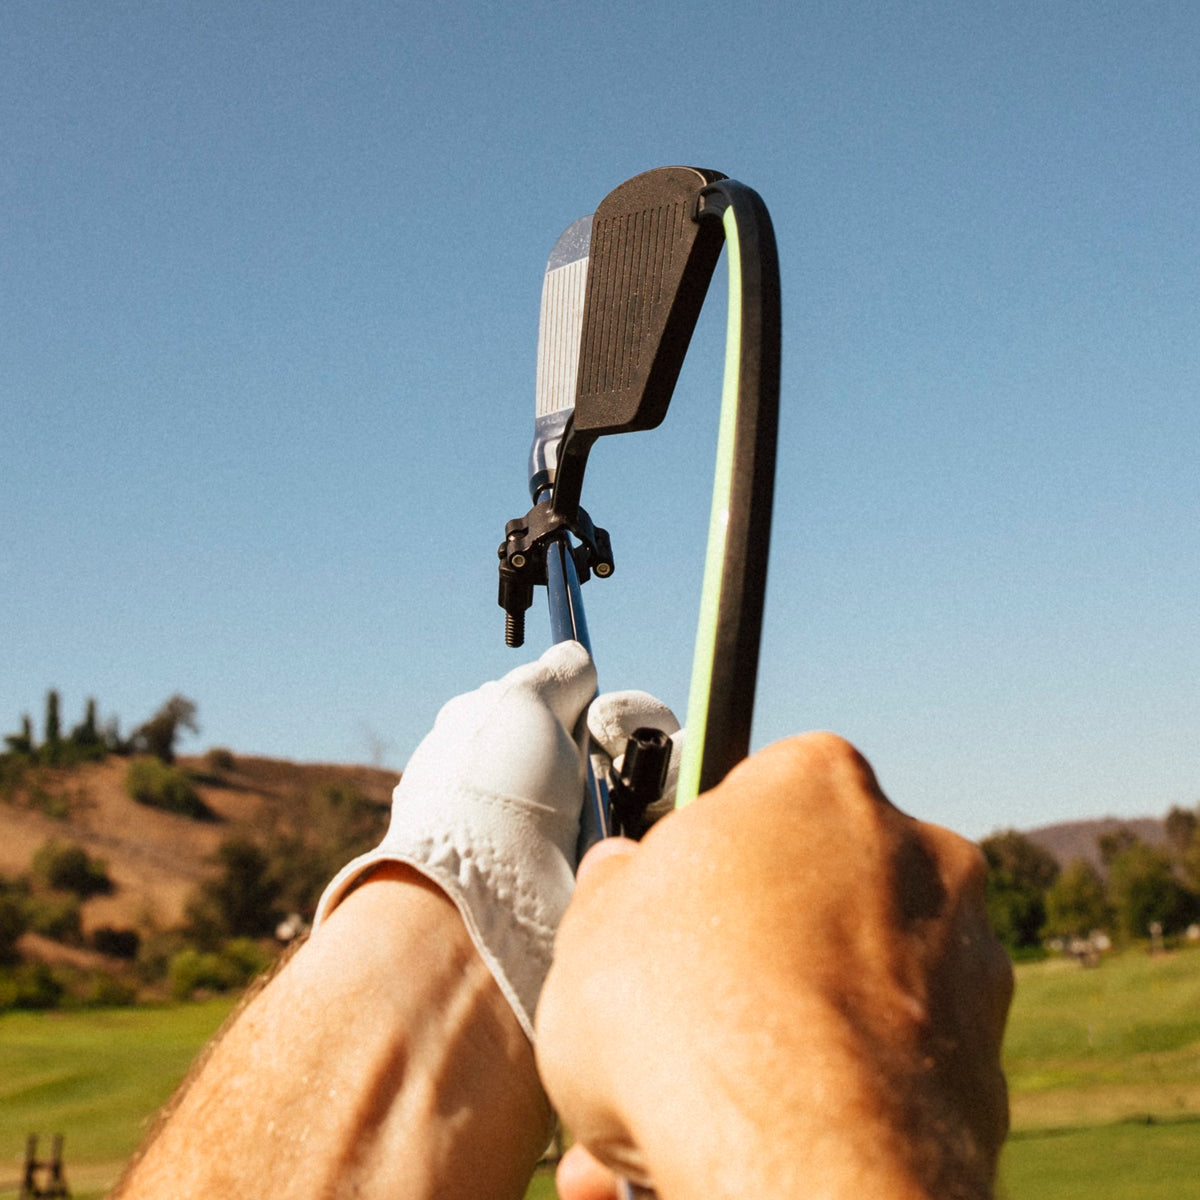
Before you make your first swing, confirm everything is aligned. A two-minute check now prevents weeks of bad reps.
Verify the Bar Matches Your Target Line
Stand in your address position and look down at theHANGER. Ask yourself these questions:
• Is the impact bar parallel to your target line?
• Does the bar clear the ground through your full backswing arc?
• Is the club face square to the target?
If any answer is no, loosen the screws, reposition, and retighten.
Take Three to Five Slow Practice Swings
Make a few swings at half speed without hitting a ball. Watch how the bar moves during the backswing and downswing. The bar should travel on a shallow plane inside the target line and return square through impact. If it scrapes the turf early, your angle is too steep. If it floats outside the line, you are coming over the top.
Begin Your First Practice Session
Now that theHANGER is installed and verified, you can start training the right mechanics from your very first swing.
Hit Chip and Pitch Shots at 50–60% Speed
Start slow with chip and pitch shots at 50–60% speed using only your arms and shoulders. Focus on keeping the impact bar on plane and clearing the ground. Low-speed reps build awareness without overwhelming your coordination.
Progress to Half and Three-Quarter Swings
Once comfortable, progress to half and three-quarter shots at 60–70% speed. Add body rotation and feel how your shoulders turn under the bar. TheHANGER should guide the club into a textbook top position with the shaft parallel to the bar and your hands high but on plane.
Move Into Full Swings Only When Ready
When confident, move to full swing with theHANGER still attached. At this stage the device reinforces the entire sequence including takeaway, rotation, downswing path, and impact position. Rushing this step leads to inconsistent feedback.
Troubleshoot Common Installation and Swing Issues
Even a clean install can surface swing flaws. Here is how to decode what theHANGER is telling you.
The Bar Hits the Ground Too Early
A steep or upright swing causes the bar to scrape the turf before impact. Work the club more inside during takeaway and let theHANGER guide you toward a shallower plane.
The Bar Stays Outside the Target Line
This signals an over-the-top move or a flying elbow. Reset your setup and initiate the backswing with your shoulders rather than your hands. The bar will pull the club back inside when you trust the feedback.
The Clamp Feels Loose After Swings
Debris inside the clamp or undertightened screws cause unwanted movement. Remove theHANGER, wipe down the hosel and clamp, then reattach and tighten fully before your next session.
The Bar Does Not Align With the Target
A misaligned club face at setup causes the bar to angle off line. Reinstall theHANGER with the face square to a mirror or alignment stick before tightening the screws.
Maintain and Store theHANGER for Long-Term Use
A few simple habits keep your training tool working like new and protect your clubs.
Wipe Down After Every Session
Clean the clamp and impact bar with a dry cloth after each use. Removing sweat, dirt, and moisture prevents corrosion and keeps the grip secure.
Loosen Screws for Long-Term Storage
While theHANGER can stay mounted on your favorite iron, loosen the screws slightly during long-term storage. This prevents metal fatigue and protects the clamp threads from warping.
Store in a Cool, Dry Location
Keep theHANGER in a cool, dry place away from extreme heat or cold. The materials are durable, but prolonged exposure to harsh environments can shorten the lifespan of the components.
Final Tips to Get the Most Out of Every Practice Session
Installation is step one, but smart habits make theHANGER a long-term game changer.
• Recheck your setup weekly, since even a small shift in the clamp throws off your feedback
• Pair theHANGER with a training mirror or phone camera to compare what you feel with what you see
• Rotate theHANGER between clubs once you build confidence, reinforcing consistent mechanics across your set
• Contact Watson Golf at (877) 780-3747 or info@watsongolf.com if you have questions, since real humans answer the phone fast, even on weekends
Frequently Asked Questions About theHANGER Golf Swing Aid
Which club should I use when I first install theHANGER?
Start with a 7, 8, or 9 iron. These mid to short irons have steeper shaft angles that make it easier to see and feel the impact bar during slow practice swings.
Do I need any tools to install theHANGER?
Yes. The included hex key (or a small Allen wrench) is all you need to tighten both clamp screws securely onto the hosel.
Can I leave theHANGER on my club during storage?
You can, but loosen the screws slightly during long-term storage. This prevents metal fatigue on the clamp and keeps the threads in good shape.
How fast should I swing during my first practice session?
Start at 50–60% speed with chip and pitch shots. Progress to 60–70% for half and three-quarter swings, then move to full speed only when the shorter swings feel consistent.
Does theHANGER work on drivers and woods?
It can attach to most clubs, but start with irons first. Woods have different lengths and lie angles that can distort the feedback until you have mastered the basics.
Who do I contact if I have installation questions?
Reach out to Watson Golf directly. Call (877) 780-3747 or email info@watsongolf.com for fast, personal support, including on weekends.
Key Takeaways for Installing theHANGER the Right Way
Installing theHANGER golf swing aid correctly comes down to three simple habits: choose a 7, 8, or 9 iron, align the green impact bar parallel to the target line, and tighten both screws so the clamp stays fixed during every swing. From there, verify your setup, start at 50–60% speed, and progress only when the slower reps feel repeatable.
Your next step is simple. Grab your favorite 7-iron, mount theHANGER using the steps above, and hit 10 chip shots at half speed today. By the end of the session, you will already feel a cleaner takeaway and a more on-plane swing.