Is your gas-powered golf cart sputtering, stalling, or refusing to start? A failing engine can sideline your weekend rounds or neighborhood cruises. When basic maintenance no longer restores performance, golf cart engine repair becomes necessary to bring your vehicle back to life. The good news is that most common issues can be diagnosed and fixed, either through a full rebuild or targeted component replacement. This guide covers recognizing failure signs, deciding between DIY repair and professional service, and selecting the correct rebuild kit for your specific engine.
Spot the Warning Signs of Engine Failure
Before assuming the worst, confirm your engine truly needs more than a tune-up. Gas golf cart engines show specific symptoms when internal components wear out.
Hard Starting or No Start Conditions
If your cart cranks slowly or refuses to start after verifying fuel delivery and spark, internal compression loss is likely. Worn piston rings, scored cylinder walls, or faulty valves prevent proper ignition. A compression test reading below 80 psi confirms internal engine damage requiring repair.
Loss of Power and Sluggish Performance
Noticeable hesitation uphill or delayed throttle response often signals declining engine health. While carburetor problems can mimic these symptoms, persistent power loss after routine tune-ups points to worn internal parts reducing combustion efficiency.
Excessive Smoke or Oil Consumption
Blue or gray exhaust smoke indicates oil entering the combustion chamber, commonly caused by worn piston rings or degraded valve seals. If you find yourself topping off oil frequently between changes, an internal rebuild is probably necessary.
Choose Between DIY Kits and Professional Service
Once you confirm engine trouble, decide whether to rebuild it yourself or send it to a shop.
Standard Engine Rebuild DIY Kits
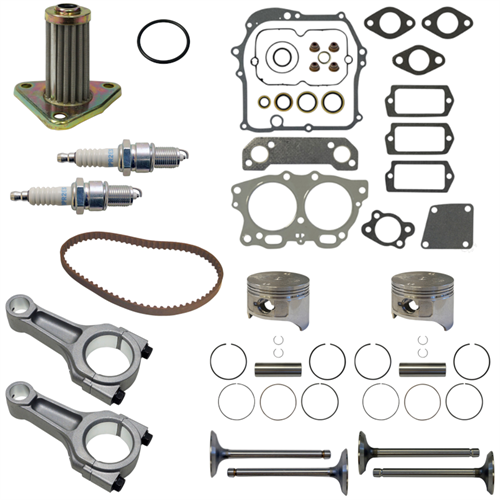
For hands-on owners, rebuild kits provide the critical wear parts needed to restore factory performance. These kits typically include pistons, rings, gaskets, bearings, and seals. For EZGO Robin-Fuji engines, kits are available in multiple configurations:
- 295cc Pre-MCI Kit for older 295cc models
- 295cc MCI Kit for updated 295cc engines
- 350cc Pre-MCI Kit for larger older engines
- 350cc MCI Kit for newer 350cc models
Each kit is tailored to specific engine types because parts are not always interchangeable between Pre-MCI and MCI versions. MCI (Motor Coach Industries) updated the engine design around 2008 with revised cooling fins, carburetor mounts, and exhaust manifolds.
Professional Golf Cart Engine Rebuild Service
If disassembling an engine feels overwhelming, professional service removes the guesswork. Experienced technicians handle complete teardown, inspection, machining when needed, and reassembly using quality components. This option works best for non-mechanics, complex damage cases, or anyone needing guaranteed results without the learning curve.
Identify Your Exact Engine Model
Selecting correct parts starts with knowing your engine specifications. EZGO carts use Robin-Fuji engines in two main displacements.
Check Displacement and MCI Status
Locate the engine serial number plate, usually found on the side or rear of the engine block. Look for “295” or “350” in the model designation and note the manufacture date. Engines built before 2008 are Pre-MCI, while 2008 and later models are MCI. Using the wrong kit leads to fitment issues and wasted time.
Verify Compatibility Before Ordering
Even within the same displacement, subtle variations exist. Confirm compatibility by cross-referencing your serial number with manufacturer support, comparing cylinder head shape and port orientation, or checking OEM part numbers. When uncertain, send photos or consult a technician, since many rebuild failures trace back to incorrect parts selection.
Gather Essential Rebuild Tools and Setup
A successful DIY engine repair requires proper equipment and workspace preparation.
Required Tools for the Job
You will need a metric socket set, torque wrench, piston ring compressor, valve spring compressor, snap ring pliers, micrometer or bore gauge, gasket scraper, and cleaning solvents. An engine stand makes the job easier but remains optional.
Prepare Your Workshop
Work in a clean, dry area to prevent dirt contamination of internal components. Label and organize parts during disassembly, take photos at each step for reassembly reference, and cover open components with shop towels. Replace all gaskets and seals every time the engine opens, even if they appear intact.
Follow a Step-by-Step Rebuild Process
While rebuild details vary by model, core procedures remain consistent across EZGO Robin-Fuji engines.
Remove and Disassemble the Engine
- Disconnect the battery and fuel lines
- Unbolt the engine from the frame and remove it
- Drain oil and remove the exhaust, carburetor, and starter
- Take off the cylinder head, then the crankcase cover
- Extract the piston and connecting rod assembly
Inspect every component during disassembly. Score marks on cylinder walls, rod wobble, cracked heads, or warped surfaces indicate additional repairs beyond a standard kit.
Inspect and Replace Worn Components
Check the cylinder bore and hone it if lightly scored, or replace it if deeply scratched. Install the new piston and ring set from your kit, ensuring correct orientation. Replace all gaskets since old ones will not seal properly. Check bearings and seals for play or corrosion, replacing as needed. Measure piston-to-cylinder clearance carefully, since exceeding manufacturer specifications causes knocking or seizure.
Reassemble with Proper Torque Settings
- Install the new base gasket and lower piston assembly
- Position the cylinder, add the head gasket, then the head
- Tighten head bolts in a star pattern to specified torque (typically 85–95 in-lbs)
- Reattach the carburetor, exhaust, and starter
- Refill with 10W-30 motor oil
Over-tightening head bolts cracks the aluminum head, so always use a torque wrench for this critical step.
Break In and Test Your Rebuilt Engine

A freshly rebuilt engine needs proper break-in to seat rings and ensure long-term reliability.
Initial Start-Up Procedure
Prime the carburetor or manually add a small amount of fuel. Crank the engine without load by keeping the cart in neutral. Let it idle for 5–10 minutes while checking for leaks, smoke, or abnormal noises.
Break-In Driving Guidelines
Avoid full throttle for the first 500 miles and vary engine speed rather than idling continuously. Change oil after the first 500 miles to remove metal particles from the break-in process. Monitor temperature and performance throughout this period. After break-in, expect smoother operation, better fuel economy, and restored power.
Prevent Future Engine Problems
Keep your rebuilt engine running strong with consistent maintenance.
Routine Maintenance Schedule
- Oil Change: Every 100 hours or 6 months
- Air Filter: Clean every 25 hours, replace annually
- Spark Plug: Replace every 100 hours
- Valve Clearance: Check every 200 hours
- Cooling Fins: Keep clean of debris
Avoid Common Maintenance Mistakes
Never run low on oil, since even brief periods cause damage. Avoid ethanol-blended fuel without adding stabilizer. Address small leaks or odd noises immediately rather than waiting. Always follow torque specifications during any reassembly work. If storing the cart more than 30 days, add fuel stabilizer to prevent moisture attraction and fuel system degradation.
Know When to Seek Professional Help
Some situations demand expert intervention beyond typical DIY capability.
Complex Damage Scenarios
Cracked engine blocks or heads, bent connecting rods, seized crankshafts, and cylinder boring requirements all call for professional machining tools and experience. These repairs exceed most home mechanics’ capabilities.
Lack of Mechanical Confidence
If engine disassembly feels overwhelming or you lack proper tools, professional golf cart engine rebuild service delivers reliable results. Paying for expertise avoids costly mistakes and gets your cart running faster than learning through trial and error.
Frequently Asked Questions About Golf Cart Engine Repair
How do I know if my golf cart engine needs a rebuild?
Common signs include hard starting, loss of power, excessive exhaust smoke, and frequent oil consumption. A compression test below 80 psi confirms internal damage requiring rebuild rather than simple maintenance.
What is the difference between Pre-MCI and MCI engines?
MCI (Motor Coach Industries) updated the Robin-Fuji engine design around 2008 with revised cooling fins, carburetor mounts, and exhaust manifolds. Parts between Pre-MCI and MCI versions are not always interchangeable, so identifying your engine type before ordering is critical.
Can I rebuild a golf cart engine myself?
Yes, if you have mechanical experience, proper tools, and a clean workspace. DIY kits include essential components like pistons, rings, and gaskets. However, complex damage or lack of confidence in your skills makes professional service the better choice.
How long does a professional engine rebuild take?
Professional rebuild services typically offer faster turnaround than sourcing parts and learning as you go. Contact the service provider for specific timeframes based on your engine condition and parts availability.
What tools do I need for a DIY engine rebuild?
Essential tools include a metric socket set, torque wrench, piston ring compressor, valve spring compressor, snap ring pliers, micrometer or bore gauge, gasket scraper, and cleaning solvents. An engine stand helps but remains optional.
How do I identify my EZGO engine displacement?
Check the engine serial number plate, usually located on the side or rear of the engine block. Look for “295” or “350” in the model designation, and note the manufacture date to determine Pre-MCI or MCI status.
Key Takeaways for Golf Cart Engine Repair Success
Addressing engine problems early extends your golf cart’s life and performance significantly. Whether you choose a DIY kit or professional rebuild, always match parts to your specific engine, whether 295cc or 350cc, Pre-MCI or MCI. Prioritize proper assembly techniques and follow torque specifications to avoid damaging aluminum components. A correctly rebuilt engine delivers smoother operation, better fuel economy, and restored power for years of reliable service.